Debian 9 10 with old PHP 5.6 and MySQL 5.6, 5.7 or 8.0 and Apache2

Debian 9 with old PHP 5.6 and MySQL 5.6, 5.7 or 8.0 and Apache2

Run below commands to upgrade the current packages to the latest version

#apt update
#apt upgrade

Install the Apache2 package

#apt install apache2

Execute the following commands to install the required packages first on your system. Then import packages signing key. After that configure PPA for the PHP packages on your system.

#apt install apt-transport-https lsb-release ca-certificates
#wget -O /etc/apt/trusted.gpg.d/php.gpg https://packages.sury.org/php/apt.gpg
#echo "deb https://packages.sury.org/php/ $(lsb_release -sc) main" >> /etc/apt/sources.list

Installing PHP 5.6

Execute the following commands for installing PHP 5.6 on your Debian 9 Stretch system.

#apt update
#apt install php5.6
#/usr/sbin/a2enmod php5.6

#/usr/sbin/a2enmod php5.6
Considering dependency mpm_prefork for php5.6:
Considering conflict mpm_event for mpm_prefork:
Considering conflict mpm_worker for mpm_prefork:
Module mpm_prefork already enabled
Considering conflict php5 for php5.6:
Module php5.6 already enabled

Optional: Install PHP MOD for PHP Mysql and GD

#apt-get install php5.6-mysql php5.6-gd

OPTIONAL: Install completed php modules.

#apt install libmcrypt-dev libreadline-dev mcrypt php-pear
#apt install php5.6{cli,common,fpm,bcmath,mysql,curl,gd,imagick,intl,mbstring,xmlrpc,xsl,dev,zip,soap,xml}

Optional: Install PHP FPM

#apt-get install php5.6-fpm

Creating config file /etc/php/5.6/fpm/php.ini with new version
NOTICE: Not enabling PHP 5.6 FPM by default.
NOTICE: To enable PHP 5.6 FPM in Apache2 do:
NOTICE: a2enmod proxy_fcgi setenvif
NOTICE: a2enconf php5.6-fpm

#/usr/sbin/a2enmod proxy_fcgi setenvif
#/usr/sbin/a2enconf php5.6-fpm

Install MYSQL Version 5.6, 5.7 or 8.0, better 5.7 or 8.0

#apt -y install wget
#wget https://repo.mysql.com//mysql-apt-config_0.8.13-1_all.deb
#dpkg -i mysql-apt-config_0.8.13-1_all.deb

During the installation the system will prompt to select MySQL version. Choose which MySQL version, 5.6, 5.7 or 8.0 available to choose then OK

#apt update
#apt -y install mysql-server

Finish up by running the MySQL secure_installation

#mysql_secure_installation

Test php working or not

Create new php file at /var/www/html

#vim info.php

write

<?php phpinfo(); ?>

Open browser http://localhost/info.php

Enable and load mod_rewrite Apache2 on Debian 8

#a2enmod rewrite

Then open and edit /etc/apache2/apache2.conf find

Options Indexes FollowSymLinks
AllowOverride All
Require all granted

Replace “AllowOverride None” to “AllowOverride all”

Enable Apache2 mod_headers & mod_expires on

To increase PageSpeed: Leverage browser caching.

enable mod_headers:

#a2enmod headers

enable mod_expires:

#a2enmod expires

Then restart Apache server to make these changes effective

#service apache2 restart


Install Nginx MariaDB PHP-FPM on CentOS 6

How to install Nginx web server, MariaDB and PHP-FPM

To avoid any conflict once NGINX service start please make sure Apache service already removed (if available). We can remove Apache service as follow
Shutdown Apache service (if running)

#service httpd stop

Remove Apache from boot cycle, so that it does not start up again on boot

#chkconfig httpd off

Remove Apache package

#yum remove httpd

UPDATE EPEL REPOSITORY

NGINX is available as a package for CentOS 6 from epel repository but first we should update epel repository, which we can install as follows:

#yum install epel-release

Install Nginx using yum

#yum install nginx

To get NGINX running type:

#/etc/init.d/nginx start

We can check that nginx has installed by open a browser and type http://ipaddressNGINX-success-installed
Configure the server to start NGINX on server boot

#chkconfig nginx on

Install MariaDB

Install MariaDB from a repository using yum, before install make sure CentOS packages is up-to-date

#yum -y update

Then add the MariaDB repository

#vi /etc/yum.repos.d/MariaDB.repo

Insert this custom MariaDB 10.1 Stable YUM repository for CentOS 6 (64 Bit).

# MariaDB 10.1 CentOS repository list - created 2016-07-03 19:01 UTC
# http://downloads.mariadb.org/mariadb/repositories/
[mariadb]
name = MariaDB
baseurl = http://yum.mariadb.org/10.1/centos6-amd64
gpgkey=https://yum.mariadb.org/RPM-GPG-KEY-MariaDB
gpgcheck=1

*** For complete custom MariaDB repository with linux system version please visit https://downloads.mariadb.org/mariadb/repositories/

Install MariaDB with yum

#yum install MariaDB-server MariaDB-client -y

Start MariaDB and set to start on every boot.

#service mysql start
#chkconfig mysql on

Secure MariaDB, secure your MariaDB installation with the following checklist
Set (Change) root password
Remove anonymous users
Disallow root login remotely.
Remove test database and access to it.
Reload privilege tables.
Run the secure installation command.

#mysql_secure_installation
Enter current password for root (enter for none):
OK, successfully used password, moving on...
Setting the root password ensures that nobody can log into the MariaDB
root user without the proper authorisation.
Set root password? [Y/n] y
New password: ENTER YOUR PASSWORD
Re-enter new password: REPEAT YOUR PASSWORD
Password updated successfully!
Reloading privilege tables..
... Success!
Remove anonymous users? [Y/n] y
... Success!
Disallow root login remotely? [Y/n] y
... Success!
Remove test database and access to it? [Y/n] y
- Dropping test database...
... Success!
- Removing privileges on test database...
... Success!
Reload privilege tables now? [Y/n] y
... Success!
Cleaning up...
Thanks for using MariaDB!

Restart MariaDB.

#service mysql restart

INSTALL PHP-FPM
The php-fpm package is located within the REMI repository, which, at this point, is disabled. The first thing we need to do is enable the REMI repository and install php and php-fpm:

#wget http://rpms.famillecollet.com/enterprise/remi-release-6.rpm
#rpm -Uvh remi-release-6.rpm

Enable REMI repository by edit file remi.repo.
Find the line enabled =0 and change all of it to 1 to enable REMI repository.

#vi /etc/yum.repos.d/remi.repo
[...]
enabled=1
[...]

Then we can install php and php-fpm as follows:

#yum install php-fpm php-mysql

Set the php-fpm processes to run automatically when server boots

#service php-fpm start
#chkconfig php-fpm on

CONFIGURE PHP
We need to make one small change in the php.ini configuration.
Find the line, cgi.fix_pathinfo=1, and change the 1 to 0

#vi /etc/php.ini
cgi.fix_pathinfo=0

If this number is kept as a 1, the php interpreter will do its best to process the file that is as near to the requested file as possible. This is a possible security risk. If this number is set to 0, conversely, the interpreter will only process the exact file path a much safer alternative. Save and Exit.

STEP SIX: CONFIGURE NGINX
Open up the default nginx config file and raise the number of worker processes to 4 then save and exit that file.

#vi /etc/nginx/nginx.conf
[...]
worker_processes  4;
[...]

Nginx already comes with a default configuration to use php fpm. Open the /etc/nginx/conf.d/default.conf file and look following lines.

#vi /etc/nginx/conf.d/default.conf
# The default server
server {
    listen       80;
    server_name example.com;
 
    location / {
        root   /usr/share/nginx/html;
        index index.php  index.html index.htm;
    }
 
    error_page  404              /404.html;
    location = /404.html {
        root   /usr/share/nginx/html;
    }

    error_page   500 502 503 504  /50x.html;
    location = /50x.html {
        root   /usr/share/nginx/html;
    }

    # pass the PHP scripts to FastCGI server listening on 127.0.0.1:9000
    #
    location ~ \.php$ {
        root           /usr/share/nginx/html;
        fastcgi_pass   127.0.0.1:9000;
        fastcgi_index  index.php;
        fastcgi_param  SCRIPT_FILENAME   $document_root$fastcgi_script_name;
        include        fastcgi_params;
    }
}

Here are the details of the changes:

  • Add index.php within the index line.
  • Change the server_name to your domain name or IP address (replace the example.com in the configuration)
  • Change the root to /usr/share/nginx/html;
  • Uncomment the section beginning with “location ~ \.php$ {“,
  • Change the root to access the actual document root, /usr/share/nginx/html;
  • Change the fastcgi_param line to help the PHP interpreter find the PHP script that we stored in the document root home.
  • Save and Exit

Open up the php-fpm configuration, replace the apache in the user and group with nginx:

#vi /etc/php-fpm.d/www.conf
; RPM: apache Choosed to be able to access some dir as httpd
user = nginx
; RPM: Keep a group allowed to write in log dir.
group = nginx

Finish by restarting php-fpm.

#service php-fpm restart

CHECK RESULTS:
Create a php info page and add in the following line:

#vi /usr/share/nginx/html/info.php
<?php
phpinfo();
?>

Then Save and Exit.
Restart nginx so that all of the changes take effect:

#service nginx restart

We can check that NGINX MySQL PHP has installed successfully by open a browser and type http://ipaddress/info.php

Set Up nginx, mysqld, php-fpm Autostart on reboot

#chkconfig --levels 235 mysql on
#chkconfig --levels 235 nginx on
#chkconfig --levels 235 php-fpm on

How to install Linux Httpd web server, MariaDB and PHP on CentOS 6

Install Linux Httpd MariaDB PHP on CentOS 6

Install Httpd, open terminal and type in this command:

#yum install -y httpd
Loaded plugins: fastestmirror
Setting up Install Process
....................................................................
Installed:
httpd.x86_64 0:2.2.15-54.el6.centos

Complete!

Start httpd and set always run on reboot with following command

#service httpd start
Starting httpd: [ OK ]
#chkconfig httpd on

Install MariaDB from a repository using yum, before install make sure CentOS packages is up-to-date

#yum -y update

Then add the MariaDB repository

#vi /etc/yum.repos.d/MariaDB.repo

Insert this custom MariaDB 10.1 Stable YUM repository for CentOS 6 (64 Bit).

# MariaDB 10.1 CentOS repository list - created 2016-07-03 19:01 UTC
# http://downloads.mariadb.org/mariadb/repositories/
[mariadb]
name = MariaDB
baseurl = http://yum.mariadb.org/10.1/centos6-amd64
gpgkey=https://yum.mariadb.org/RPM-GPG-KEY-MariaDB
gpgcheck=1

MariaDB 10.1 Stable YUM repository for CentOS 6

# MariaDB 10.1 CentOS repository list - created 2016-12-03 16:57 UTC
# http://downloads.mariadb.org/mariadb/repositories/
[mariadb]
name = MariaDB
baseurl = http://yum.mariadb.org/10.1/centos6-x86
gpgkey=https://yum.mariadb.org/RPM-GPG-KEY-MariaDB
gpgcheck=1

For complete custom MariaDB repository with linux system version please visit
https://downloads.mariadb.org/mariadb/repositories/

Install MariaDB

#yum install MariaDB-server MariaDB-client -y

Start MariaDB and set to start on every boot.

#service mysql start
#chkconfig mysql on

Secure MariaDB, secure your MariaDB installation with the following checklist
Set (Change) root password
Remove anonymous users
Disallow root login remotely.
Remove test database and access to it.
Reload privilege tables.
Run the secure installation command.

#mysql_secure_installation

Enter current password for root (enter for none):
OK, successfully used password, moving on...

Setting the root password ensures that nobody can log into the MariaDB
root user without the proper authorisation.

Set root password? [Y/n] y
New password: ENTER YOUR PASSWORD
Re-enter new password: REPEAT YOUR PASSWORD
Password updated successfully!
Reloading privilege tables..
... Success!

Remove anonymous users? [Y/n] y
... Success!

Disallow root login remotely? [Y/n] y
... Success!

Remove test database and access to it? [Y/n] y
- Dropping test database...
... Success!
- Removing privileges on test database...
... Success!

Reload privilege tables now? [Y/n] y
... Success!

Cleaning up...

Thanks for using MariaDB!

Restart MariaDB.

#service mysql restart

Install PHP by open terminal and type in this command:

#yum install php php-mysql php-gd -y

** Install PHP-GD library if necessary, PHP GD is PHP Modules to support manipulating images like imagejpeg, imagedestroy, etc

#service httpd restart

Install MariaDB Server on CentOS 6

Most people said MariaDB better then old MySQL Server, so i decided to migrate Database Server from old MySQL to new MariaDB Server

For brief info MariaDB is a community-developed fork of the MySQL relational database management system intended to remain free under the GNU GPL. It is notable for being led by the original developers of MySQL, who forked it due to concerns over its acquisition by Oracle.

For CentOS system highly recommended to install MariaDB from a repository using yum.
First step make sure list of available CentOS packages is up-to-date before installing by input following commands.

#yum -y update

Then add the MariaDB repository

#vi /etc/yum.repos.d/MariaDB.repo

Insert this custom MariaDB 10.1 Stable YUM repository for CentOS 6 (64 Bit).

# MariaDB 10.1 CentOS repository list - created 2016-07-03 19:01 UTC
# http://downloads.mariadb.org/mariadb/repositories/
[mariadb]
name = MariaDB
baseurl = http://yum.mariadb.org/10.1/centos6-amd64
gpgkey=https://yum.mariadb.org/RPM-GPG-KEY-MariaDB
gpgcheck=1

For complete custom MariaDB repository with linux system version please visit

https://downloads.mariadb.org/mariadb/repositories/

Install MariaDB

#yum install MariaDB-server MariaDB-client -y

Start MariaDB and set to start on every boot.

#service mysql start
#chkconfig mysql on

Secure MariaDB, Secure your MariaDB installation. The following checklist shows the steps that will be performed.
Set (Change) root password.
Remove anonymous users.
Disallow root login remotely.
Remove test database and access to it.
Reload privilege tables.
Run the secure installation command.

#mysql_secure_installation
Example output

NOTE: RUNNING ALL PARTS OF THIS SCRIPT IS RECOMMENDED FOR ALL MariaDB
SERVERS IN PRODUCTION USE! PLEASE READ EACH STEP CAREFULLY!

In order to log into MariaDB to secure it, we'll need the current
password for the root user. If you've just installed MariaDB, and
you haven't set the root password yet, the password will be blank,
so you should just press enter here.

Enter current password for root (enter for none):
OK, successfully used password, moving on...

Setting the root password ensures that nobody can log into the MariaDB
root user without the proper authorisation.

Set root password? [Y/n] y
New password: ENTER YOUR PASSWORD
Re-enter new password: REPEAT YOUR PASSWORD
Password updated successfully!
Reloading privilege tables..
... Success!

By default, a MariaDB installation has an anonymous user, allowing anyone
to log into MariaDB without having to have a user account created for
them. This is intended only for testing, and to make the installation
go a bit smoother. You should remove them before moving into a
production environment.

Remove anonymous users? [Y/n] y
... Success!

Normally, root should only be allowed to connect from 'localhost'. This
ensures that someone cannot guess at the root password from the network.

Disallow root login remotely? [Y/n] y
... Success!

By default, MariaDB comes with a database named 'test' that anyone can
access. This is also intended only for testing, and should be removed
before moving into a production environment.

Remove test database and access to it? [Y/n] y
- Dropping test database...
... Success!
- Removing privileges on test database...
... Success!

Reloading the privilege tables will ensure that all changes made so far
will take effect immediately.

Reload privilege tables now? [Y/n] y
... Success!

Cleaning up...

All done! If you've completed all of the above steps, your MariaDB
installation should now be secure.

Thanks for using MariaDB!

Restart MariaDB.

#service mysql restart

Import Export MySQL Dumpfile MySQL Server on Terminal

This is an alternative way to restore or import MySQL Dumpfile data with mysql command on Terminal.
Best tool to restore or import MySQL Dumpfile is phpMyAdmin, here is the tutorial to Set up Apache phpMyadmin and Nginx phpMyAdmin

This is restore or import dbuser.sql dumpfile into dbuser MySQL database using user as username:

First we upload MySQL dumpfile to terminal or home folder of user
Easy simple way by log in via SFTP (SSH File Transfer Protocol), this is same way a  user log via ssh. We can use Bitvise, Filezilla, etc.

Assume database ‘dbuser’ has been created and MySQL dumpfile (dbuser.sql) has been uploaded to user home folder, user log in to terminal and in home directory position.

#ls -la
dbuser.sql

Import: To MySQL dump data file to MySQL Server type the following command:

#pwd
/home/user
#mysql -u user -p -h localhost dbuser < dbuser.sql

Export: To Export a database and create dump file from MySQL Server type the following command:

#mysqldump -u [username] -p [database name] > [database name].sql

Create mySQL User Grant PRIVILEGES to Database

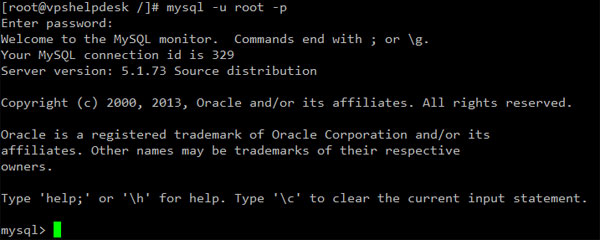
Connect to mySQL server as root from console by type

[root@vpshelpdesk]#mysql -u root -p
Connect-to-mySQL-server-as-root-from-console

Create a mySQL database from console by type this

mysql>CREATE DATABASE dbuser;
create-database-mySQL

mysql>CREATE USER 'user'@'localhost' IDENTIFIED BY 'password';
mysql>GRANT ALL PRIVILEGES ON dbuser.* TO 'user'@'localhost' WITH GRANT OPTION;
mysql>CREATE USER 'user'@'%' IDENTIFIED BY 'password';
mysql>GRANT ALL PRIVILEGES ON dbuser.* TO 'user'@'%' WITH GRANT OPTION;
mysql>FLUSH PRIVILEGES;
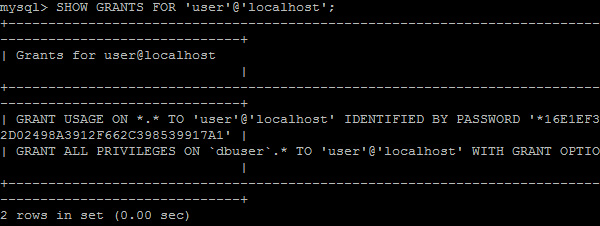
mysql>SHOW GRANTS FOR 'user'@'localhost';
SHOW-GRANTS-FOR-user-localhost
Displaying list of users, use the SELECT USER statement
mysql>SELECT USER FROM mysql.user;

To remove an account, use the DROP USER statement

mysql>DROP USER 'user'@'localhost';

Displaying list of all databases, use the SHOW  DATABASES statement

mysql>show databases;

To remove an database, use the DROP DATABASE statement

mysql>DROP DATABASE dbuser;