Import Export MySQL Dumpfile MySQL Server on Terminal

This is an alternative way to restore or import MySQL Dumpfile data with mysql command on Terminal.
Best tool to restore or import MySQL Dumpfile is phpMyAdmin, here is the tutorial to Set up Apache phpMyadmin and Nginx phpMyAdmin

This is restore or import dbuser.sql dumpfile into dbuser MySQL database using user as username:

First we upload MySQL dumpfile to terminal or home folder of user
Easy simple way by log in via SFTP (SSH File Transfer Protocol), this is same way a  user log via ssh. We can use Bitvise, Filezilla, etc.

Assume database ‘dbuser’ has been created and MySQL dumpfile (dbuser.sql) has been uploaded to user home folder, user log in to terminal and in home directory position.

#ls -la
dbuser.sql

Import: To MySQL dump data file to MySQL Server type the following command:

#pwd
/home/user
#mysql -u user -p -h localhost dbuser < dbuser.sql

Export: To Export a database and create dump file from MySQL Server type the following command:

#mysqldump -u [username] -p [database name] > [database name].sql

Set Up Apache Virtual Hosts on CentOS 6

Virtual Hosts are used to run more than one domain off of a single IP address, there is no limit to the number of virtual hosts that can be added to a VPS.

We assume httpd has been successfully installed, if not visit http://vpshelpdesk.com/2016/06/05/install-linux-apache-mysql-php-lamp-on-centos-6/

Step One Create a New Directory
The first step in creating a virtual host is to a create a directory where we will keep the new website’s information. This location will be your Document Root in the Apache virtual configuration file later on. By adding a -p to the line of code that allows us to create a folder with a nested folder inside of it

#mkdir -p /var/www/example.com/public_html

Step Two Grant Permissions
We need to grant ownership of the directory to the user, instead of just keeping it on the root system. (assumed username ‘user’ has been added)

#chown -R user:apache /var/www/example.com/public_html

Additionally, it is important to make sure that everyone will be able to read our new files.

#chmod 755 /var/www

Step Three Create the Page
We need to create a new file called index.html within our configurations directory.

#vi /var/www/example.com/public_html/index.html

<html>
<head>
<title>www.example.com</title>
</head>
<body>
<h1>Success: You Have Set Up a Virtual Host</h1>
</body>
</html>

Step Four Turn on Virtual Hosts
The next step is to enter into the apache configuration file itself.

#vi /etc/httpd/conf/httpd.conf

There are a few lines to look for, make sure that your text matches what you see below.

#Listen 12.34.56.78:80
Listen 80
#
NameVirtualHost *:80
#
# NOTE: NameVirtualHost cannot be used without a port specifier
# (e.g. :80) if mod_ssl is being used, due to the nature of the
# SSL protocol.
#
# VirtualHost example:
# Almost any Apache directive may go into a VirtualHost container.
# The first VirtualHost section is used for requests without a known
# server name.
#
<VirtualHost *:80>
ServerName www.example.com
ServerAlias example.com
DocumentRoot /var/www/example.com/public_html
ErrorLog /var/www/example.com/public_html/error.log
CustomLog /var/www/example.com/public_html/requests.log combined
</VirtualHost>

Step Five Restart Apache
We’ve made a lot of the changes to the configuration. However, they will not take effect until Apache is restarted.

# apachectl -k stop
#/etc/init.d/httpd start

Optional Step Six Setting Up the Local Hosts
If you have pointed your domain name to your virtual private server’s IP address you can skip this step. You do not need to set up local hosts. Your virtual hosts should work. However, if want to try out your new virtual hosts without having to connect to an actual domain name, you can set up local hosts on your computer alone. For this step, make sure you are on the computer itself, not your droplet. To proceed with this step you need to know your computer’s administrative password, otherwise you will be required to use an actual domain name to test the virtual hosts.

#vi /etc/hosts

You can add the local hosts details to this file, as seen in the example below. As long as that line is there, directing your browser toward, say, example.com will give you all the virtual host details for the corresponding IP address.

# Host Database
# localhost is used to configure the loopback interface
# when the system is booting. Do not change this entry.
##
127.0.0.1 localhost
#Virtual Hosts
12.34.56.789 www.example.com

Adding More Virtual Hosts
To create additional virtual hosts, you can just repeat the process above, being careful to set up a new document root with the appropriate new domain name each time. Then just copy and paste the new Virtual Host information into the Apache Config file, as shown below

<VirtualHost *:80>
ServerName www.example2.com
ServerAlias example2.com
DocumentRoot /var/www/example2.com/public_html
ErrorLog /var/www/example2.com/public_html/error.log
CustomLog /var/www/example2.com/public_html/requests.log combined
</VirtualHost>

Create mySQL User Grant PRIVILEGES to Database

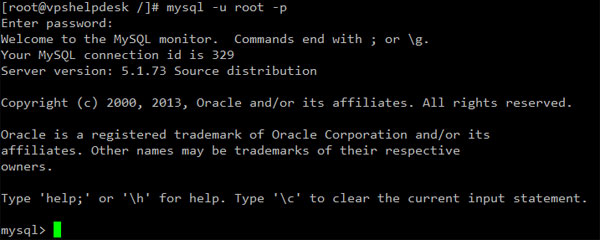
Connect to mySQL server as root from console by type

[root@vpshelpdesk]#mysql -u root -p
Connect-to-mySQL-server-as-root-from-console

Create a mySQL database from console by type this

mysql>CREATE DATABASE dbuser;
create-database-mySQL

mysql>CREATE USER 'user'@'localhost' IDENTIFIED BY 'password';
mysql>GRANT ALL PRIVILEGES ON dbuser.* TO 'user'@'localhost' WITH GRANT OPTION;
mysql>CREATE USER 'user'@'%' IDENTIFIED BY 'password';
mysql>GRANT ALL PRIVILEGES ON dbuser.* TO 'user'@'%' WITH GRANT OPTION;
mysql>FLUSH PRIVILEGES;
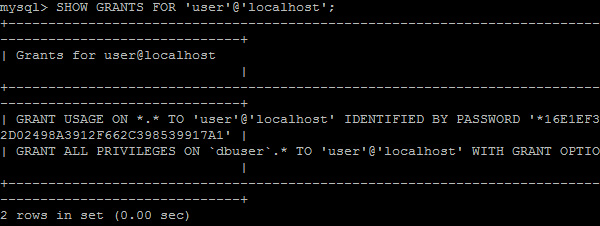
mysql>SHOW GRANTS FOR 'user'@'localhost';
SHOW-GRANTS-FOR-user-localhost
Displaying list of users, use the SELECT USER statement
mysql>SELECT USER FROM mysql.user;

To remove an account, use the DROP USER statement

mysql>DROP USER 'user'@'localhost';

Displaying list of all databases, use the SHOW  DATABASES statement

mysql>show databases;

To remove an database, use the DROP DATABASE statement

mysql>DROP DATABASE dbuser;

Install Linux Apache MySQL PHP (LAMP) on CentOS 6

Step One Install Apache
To install apache, open terminal and type in this command:

#yum install httpd
install-apache-yum-install-httpd

Once install complete, you can start apache running on your VPS:

#service httpd start
service-httpd-start

Sometimes or often error occured “Starting httpd: httpd: Could not reliably determine the server’s fully qualified domain name, using x.x.x.x for ServerName” once start or restart httpd. To resolve this problem simply edit httpd.conf

#vi /etc/httpd/conf/httpd.conf

Find ServerName then change to

#ServerName www.example.com:80
ServerName localhost

Save then restart httpd

# service httpd restart
Stopping httpd: [ OK ]
Starting httpd: [ OK ]

To check if Apache is installed, direct your browser to your server’s IP address http://ipaddressapache-httpd-success-installed

Set the processes to run automatically when server boots

#chkconfig httpd on

Step Two Install MySQL
MySQL is a powerful database management system used for organizing and retrieving data on a virtual server. To install MySQL, open terminal and type in these commands:

#yum install mysql-server
#service mysqld start

During the installation, MySQL will ask you for your permission twice. After you say Yes to both, MySQL will install. Once it is done installing, you can set a root MySQL password:

#/usr/bin/mysql_secure_installation

The prompt will ask you for your current root password. Since you just installed MySQL, you most likely won’t have one, so leave it blank by pressing enter.

Enter current password for root (enter for none):
OK, successfully used password, moving on...
Setting the root password ensures that nobody can log into the MySQL
root user without the proper authorisation.
Set root password? [Y/n]
New password:
Re-enter new password:
Password updated successfully!
Reloading privilege tables..
 ... Success!
Remove anonymous users? [Y/n] y
 ... Success!
Remove test database and access to it? [Y/n] y
 - Dropping test database...
 ... Success!
 - Removing privileges on test database...
 ... Success!
Reload privilege tables now? [Y/n] y
 ... Success!
Cleaning up...
All done!  If you've completed all of the above steps, your MySQL
installation should now be secure.
Thanks for using MySQL!

Set the processes to run automatically when server boots

#chkconfig mysqld on

Step Three Install PHP
To install PHP on your virtual private server, open terminal and type in this command:

#yum install php php-mysql

Once you answer yes to the PHP prompt, PHP will be installed. Restart Apache (php will run automatically once Apache starts):

#service httpd restart

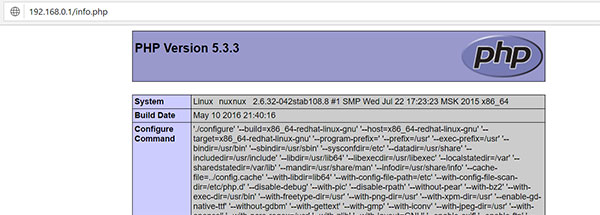
Test PHP by create info.php at /var/www/html/

#vi /var/www/html/info.php
<?php
phpinfo();
?>

Then access browser http://ipaddress/info.phpphp-info
Install PHP-GD library
PHP GD is PHP Modules to support manipulating images like imagejpeg, imagedestroy, etc

#yum install php-gd
#service httpd restart

Check if PHP-GD has been successfully integrated with PHP Modules

#php -m
[PHP Modules]
bz2
.....
gd
.....
mysql
.....

check if “gd” available on the list