Step One Install Apache
To install apache, open terminal and type in this command:
#yum install httpd

Once install complete, you can start apache running on your VPS:
#service httpd start

Sometimes or often error occured “Starting httpd: httpd: Could not reliably determine the server’s fully qualified domain name, using x.x.x.x for ServerName” once start or restart httpd. To resolve this problem simply edit httpd.conf
#vi /etc/httpd/conf/httpd.conf
Find ServerName then change to
#ServerName www.example.com:80
ServerName localhost
Save then restart httpd
# service httpd restart
Stopping httpd: [ OK ]
Starting httpd: [ OK ]
To check if Apache is installed, direct your browser to your server’s IP address http://ipaddress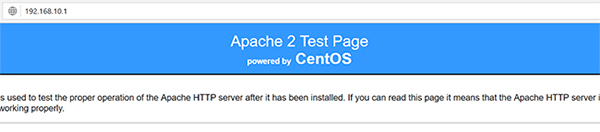
Set the processes to run automatically when server boots
#chkconfig httpd on
Step Two Install MySQL
MySQL is a powerful database management system used for organizing and retrieving data on a virtual server. To install MySQL, open terminal and type in these commands:
#yum install mysql-server
#service mysqld start
During the installation, MySQL will ask you for your permission twice. After you say Yes to both, MySQL will install. Once it is done installing, you can set a root MySQL password:
#/usr/bin/mysql_secure_installation
The prompt will ask you for your current root password. Since you just installed MySQL, you most likely won’t have one, so leave it blank by pressing enter.
Enter current password for root (enter for none):
OK, successfully used password, moving on...
Setting the root password ensures that nobody can log into the MySQL
root user without the proper authorisation.
Set root password? [Y/n]
New password:
Re-enter new password:
Password updated successfully!
Reloading privilege tables..
 ... Success!
Remove anonymous users? [Y/n] y
 ... Success!
Remove test database and access to it? [Y/n] y
 - Dropping test database...
 ... Success!
 - Removing privileges on test database...
 ... Success!
Reload privilege tables now? [Y/n] y
 ... Success!
Cleaning up...
All done!  If you've completed all of the above steps, your MySQL
installation should now be secure.
Thanks for using MySQL!
Set the processes to run automatically when server boots
#chkconfig mysqld on
Step Three Install PHP
To install PHP on your virtual private server, open terminal and type in this command:
#yum install php php-mysql
Once you answer yes to the PHP prompt, PHP will be installed. Restart Apache (php will run automatically once Apache starts):
#service httpd restart
Test PHP by create info.php at /var/www/html/
#vi /var/www/html/info.php
<?php
phpinfo();
?>
Then access browser http://ipaddress/info.php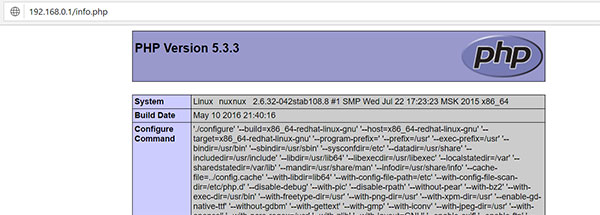
Install PHP-GD library
PHP GD is PHP Modules to support manipulating images like imagejpeg, imagedestroy, etc
#yum install php-gd
#service httpd restart
Check if PHP-GD has been successfully integrated with PHP Modules
#php -m
[PHP Modules]
bz2
.....
gd
.....
mysql
.....
check if “gd” available on the list