Set up Postfix Gmail SMTP Relay on CentOS 6

This article describe how to Set up and Configure Postfix Gmail SMTP Relay on CentOS 6, we will set up Gmail as a Mail Relay, a Gmail account must ready to configure MTA to relay outgoing mail through Gmail.
Postfix is an MTA (Mail Transfer Agent), an application used to send and receive email.
GMail is a free web-based email service by Google with reliability and robust infrastructure who provides a simple sending email from the command line with smtp.gmail.com:587.

We Assume a website have contact form php page for visitor to send message. Postifx Mail Transfer Agent will deliver the message to recipient but guarantee the message will mark as spam. But if Postifx configure to use GMail as SMTP Relay, the message will send by Gmail account which already set up and configure on Postifx, so far the message will store at inbox not spam.

Install Postfix, make sure SASL authentication framework, and mailx also installed.
First Remove default MTA sendmail first if it’s already installed, make sure postfix as default MTA

#yum remove sendmail
#yum install postfix cyrus-sasl-plain mailx -y

Postfix will need to be start before the SASL framework will be detected.

#service postfix start

If error occurred postfix failed to start

Starting postfix:                                          [FAILED]
#tail -f /var/log/maillog
postfix[1070]:fatal:config variable inet_interfaces:host not found:localhost

Change the inet_interfaces setting in /etc/postfix/main.cf from:

inet_interfaces = localhost inet_interfaces = 127.0.0.1

Postfix should also be set to start on boot.

#chkconfig postfix on

Check that Postfix configured with SSL support (ie. ldd should return at least one line starting with libssl):

#whereis -b postfix
postfix: /usr/sbin/postfix /etc/postfix /usr/libexec/postfix
#ldd /usr/sbin/postfix
libssl.so.6 => /lib/libssl.so.6 (0x00111000)

Find your server’s CA root certificate bundle path, which is typically distributed with openssl. The bundle file is used by Postfix to verify Gmail’s SSL certificate (signed by Thawte).

#locate ca-bundle.crt
/etc/ssl/certs/ca-bundle.crt

Then edit /etc/postfix/main.cf, simply add/paste the following lines to the end of the file.

#vi /etc/postfix/main.cf
myhostname = hostname.example.com
relayhost = [smtp.gmail.com]:587
smtp_use_tls = yes
smtp_sasl_auth_enable = yes
smtp_sasl_password_maps = hash:/etc/postfix/sasl_passwd
smtp_tls_CAfile = /etc/ssl/certs/ca-bundle.crt
smtp_sasl_security_options = noanonymous
smtp_sasl_tls_security_options = noanonymous

The myhostname is optional. If hostname is not specified, Postfix will use the fully-qualified domain name of the server.

Configure Postfix SASL Credentials
The Gmail credentials must now be added for authentication. Create a /etc/postfix/sasl_passwd file and add following line:

#vi /etc/postfix/sasl_passwd
[smtp.gmail.com]:587 username:password

The username and password values must be replaced with valid Gmail credentials.
A Postfix lookup table must now be generated from the sasl_passwd text file by running the following command.

#postmap /etc/postfix/sasl_passwd

Access to the sasl_passwd files should be restricted.

#chown root:postfix /etc/postfix/sasl_passwd*
#chmod 640 /etc/postfix/sasl_passwd*

Lastly, reload the Postfix configuration.

#service postfix restart

Test the Relay
Use the mail command to test the relay.

echo "This is a test." | mail -s "test message" [email protected]

The destination address should receive the test message.
Troubleshoot Delivery Issues
The maillog can be reviewed if the test message is not successfully delivered. Open another shell and run tail while performing another test.

tail -f /var/log/maillog

If there are not enough details in the maillog to determine the problem, then the debug level can be increased by adding the following lines to the /etc/postfix/main.cf.

debug_peer_list=smtp.gmail.com
debug_peer_level=3

The Postfix configuration must be reloaded after updating the main.cf file.

#service postfix restart

Remember to remove the debug settings when testing is complete. The verbose logs can have a negative impact on server performance.

PROBLEM or ERROR occurred and how to resolve them
Port 25 open by iptables firewall
Make sure port 25 open has been accept by iptables firewall, visit this article to Install and Set Up Iptables Firewall on Centos 6
Postfix Gmail SMTP Relay access denied

rcpt to: [email protected]
554 5.7.1 <[email protected]>: : Relay access denied

Your Google Account has been suspendedYour-Google-Account-has-been-suspended

Hi vpshelpdesk,
Google has suspended your Account, [email protected], because of a violation of our Terms of Service.

Please follow possible solution below, so far it is working for meallow-less-secure-apps-ON

Change the “allow less secure apps” setting to enable. This allows them to connect to the account again.
Insert and Verify Account recovery email and phoneVerify-Account-recovery-email-and-phone

If Gmail SMTP Relay rare to use and rare sign in sometimes the message will not deliver again. Once check tail -f /var/log/maillog, we will find error below;

May 16 14:31:43 vpsheldesk.com postfix/smtp[1096]: D738BA40BE0: to=, relay=smtp.gmail.com[74.125.138.109]:587, delay=31, delays=0.01/0.04/31/0, dsn=4.7.14, status=deferred (SASL authentication failed; server smtp.gmail.com[74.125.138.109] said: 534-5.7.14 Please log in via your web browser and?534-5.7.14 then try again.?534-5.7.14 Learn more at?534 5.7.14 https://support.google.com/mail/answer/78754 w190sm8732463ywa.39 - gsmtp)
Visit GMAIL HELP https://support.google.com/mail/answer/78754 and follow the instructions


Can’t sign in to my email app
If you’re using the wrong Gmail password on another email app, you might have these problems:

  • The app keeps asking for your username and password
  • You see an “invalid credentials” error message
  • You see a “web login required” error message

If you have these problems or can’t sign in, first check to make sure you’re using the right password.

Tip: Keep in mind that passwords are case-sensitive.
Troubleshoot sign-in problems
If you’re sure your password is right, try these tips:

  • If you’ve turned on 2-Step Verification for your account, you might need to enter an App password instead of your regular password.
  • Sign in to your account from the web version of Gmail at https://mail.google.com. Once you’re signed in, try signing in to the mail app again.
  • Visit http://www.google.com/accounts/DisplayUnlockCaptcha and sign in with your Gmail username and password. If asked, enter the letters in the distorted picture.
  • Your app might not support the latest security standards. Try changing a few settings to allow less secure apps access to your account.
  • Make sure your mail app isn’t set to check for new email too often. If your mail app check for new messages more than once every 10 minutes, the app’s access to your account could be blocked.
  • Change your password according to our tips on creating a strong password.
Set Up Apache Virtual Hosts on CentOS 6

Virtual Hosts are used to run more than one domain off of a single IP address, there is no limit to the number of virtual hosts that can be added to a VPS.

We assume httpd has been successfully installed, if not visit http://vpshelpdesk.com/2016/06/05/install-linux-apache-mysql-php-lamp-on-centos-6/

Step One Create a New Directory
The first step in creating a virtual host is to a create a directory where we will keep the new website’s information. This location will be your Document Root in the Apache virtual configuration file later on. By adding a -p to the line of code that allows us to create a folder with a nested folder inside of it

#mkdir -p /var/www/example.com/public_html

Step Two Grant Permissions
We need to grant ownership of the directory to the user, instead of just keeping it on the root system. (assumed username ‘user’ has been added)

#chown -R user:apache /var/www/example.com/public_html

Additionally, it is important to make sure that everyone will be able to read our new files.

#chmod 755 /var/www

Step Three Create the Page
We need to create a new file called index.html within our configurations directory.

#vi /var/www/example.com/public_html/index.html

<html>
<head>
<title>www.example.com</title>
</head>
<body>
<h1>Success: You Have Set Up a Virtual Host</h1>
</body>
</html>

Step Four Turn on Virtual Hosts
The next step is to enter into the apache configuration file itself.

#vi /etc/httpd/conf/httpd.conf

There are a few lines to look for, make sure that your text matches what you see below.

#Listen 12.34.56.78:80
Listen 80
#
NameVirtualHost *:80
#
# NOTE: NameVirtualHost cannot be used without a port specifier
# (e.g. :80) if mod_ssl is being used, due to the nature of the
# SSL protocol.
#
# VirtualHost example:
# Almost any Apache directive may go into a VirtualHost container.
# The first VirtualHost section is used for requests without a known
# server name.
#
<VirtualHost *:80>
ServerName www.example.com
ServerAlias example.com
DocumentRoot /var/www/example.com/public_html
ErrorLog /var/www/example.com/public_html/error.log
CustomLog /var/www/example.com/public_html/requests.log combined
</VirtualHost>

Step Five Restart Apache
We’ve made a lot of the changes to the configuration. However, they will not take effect until Apache is restarted.

# apachectl -k stop
#/etc/init.d/httpd start

Optional Step Six Setting Up the Local Hosts
If you have pointed your domain name to your virtual private server’s IP address you can skip this step. You do not need to set up local hosts. Your virtual hosts should work. However, if want to try out your new virtual hosts without having to connect to an actual domain name, you can set up local hosts on your computer alone. For this step, make sure you are on the computer itself, not your droplet. To proceed with this step you need to know your computer’s administrative password, otherwise you will be required to use an actual domain name to test the virtual hosts.

#vi /etc/hosts

You can add the local hosts details to this file, as seen in the example below. As long as that line is there, directing your browser toward, say, example.com will give you all the virtual host details for the corresponding IP address.

# Host Database
# localhost is used to configure the loopback interface
# when the system is booting. Do not change this entry.
##
127.0.0.1 localhost
#Virtual Hosts
12.34.56.789 www.example.com

Adding More Virtual Hosts
To create additional virtual hosts, you can just repeat the process above, being careful to set up a new document root with the appropriate new domain name each time. Then just copy and paste the new Virtual Host information into the Apache Config file, as shown below

<VirtualHost *:80>
ServerName www.example2.com
ServerAlias example2.com
DocumentRoot /var/www/example2.com/public_html
ErrorLog /var/www/example2.com/public_html/error.log
CustomLog /var/www/example2.com/public_html/requests.log combined
</VirtualHost>

Create mySQL User Grant PRIVILEGES to Database

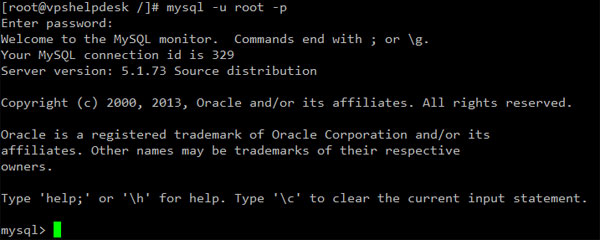
Connect to mySQL server as root from console by type

[root@vpshelpdesk]#mysql -u root -p
Connect-to-mySQL-server-as-root-from-console

Create a mySQL database from console by type this

mysql>CREATE DATABASE dbuser;
create-database-mySQL

mysql>CREATE USER 'user'@'localhost' IDENTIFIED BY 'password';
mysql>GRANT ALL PRIVILEGES ON dbuser.* TO 'user'@'localhost' WITH GRANT OPTION;
mysql>CREATE USER 'user'@'%' IDENTIFIED BY 'password';
mysql>GRANT ALL PRIVILEGES ON dbuser.* TO 'user'@'%' WITH GRANT OPTION;
mysql>FLUSH PRIVILEGES;
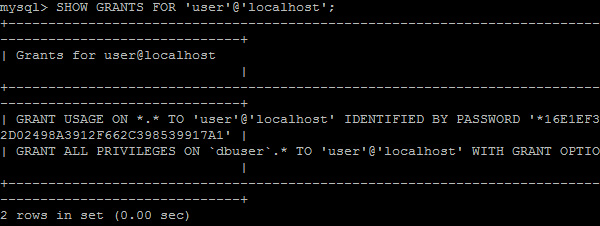
mysql>SHOW GRANTS FOR 'user'@'localhost';
SHOW-GRANTS-FOR-user-localhost
Displaying list of users, use the SELECT USER statement
mysql>SELECT USER FROM mysql.user;

To remove an account, use the DROP USER statement

mysql>DROP USER 'user'@'localhost';

Displaying list of all databases, use the SHOW  DATABASES statement

mysql>show databases;

To remove an database, use the DROP DATABASE statement

mysql>DROP DATABASE dbuser;

Install and Secure phpMyAdmin Apache

Step One Install phpMyAdmin
The EPEL repository can be made available to your server by installing a special package called epel-release. This will reconfigure your repository list and give you access to the EPEL packages. To install, just type:

#yum install epel-release

Now that the EPEL repo is configured, you can install the phpMyAdmin package using the yum packaging system by typing:

#yum install phpmyadmin

phpMyadmin is up, try to access at

http://server_domain_or_IP/phpMyAdmin
Forbidden

You don’t have permission to access /phpMyAdmin on this server. We will need to modify this a bit to get it to work correctly for our installation. Open the file in your text editor now so that we can make a few changes:

#vi /etc/httpd/conf.d/phpMyAdmin.conf
     # Apache 2.4
       #Require ip 127.0.0.1
       #Require ip ::1
       Require all granted
     # Apache 2.2
       #Order Deny,Allow
       #Deny from All
       #Allow from 127.0.0.1
       #Allow from ::1

Restart the Apache web server to implement your modifications by typing:

#service httpd restart

With that, our phpMyAdmin installation is now operational at http://server_domain_or_IP/phpMyAdmin

Changing the Application’s Access Location

We simply need to rename the alias. Open the phpMyAdmin Apache configuration file now:

#vi /etc/httpd/conf.d/phpMyAdmin.conf

We want to disable these specific aliases since they are heavily targeted by bots and malicious users. In our case, we’ll go with /dbadmin.
To apply our intended changes, we should remove or comment out the existing lines and add our own:

# Alias /phpMyAdmin /usr/share/phpMyAdmin
# Alias /phpmyadmin /usr/share/phpMyAdmin
Alias /dbadmin /usr/share/phpMyAdmin

To implement the changes, restart the web service:

#service httpd restart

Now, if you go to the previous location of your phpMyAdmin installation, you will get a 404 error: http://server_domain_or_IP/dbadminphpmyadmin


Install Linux Apache MySQL PHP (LAMP) on CentOS 6

Step One Install Apache
To install apache, open terminal and type in this command:

#yum install httpd
install-apache-yum-install-httpd

Once install complete, you can start apache running on your VPS:

#service httpd start
service-httpd-start

Sometimes or often error occured “Starting httpd: httpd: Could not reliably determine the server’s fully qualified domain name, using x.x.x.x for ServerName” once start or restart httpd. To resolve this problem simply edit httpd.conf

#vi /etc/httpd/conf/httpd.conf

Find ServerName then change to

#ServerName www.example.com:80
ServerName localhost

Save then restart httpd

# service httpd restart
Stopping httpd: [ OK ]
Starting httpd: [ OK ]

To check if Apache is installed, direct your browser to your server’s IP address http://ipaddressapache-httpd-success-installed

Set the processes to run automatically when server boots

#chkconfig httpd on

Step Two Install MySQL
MySQL is a powerful database management system used for organizing and retrieving data on a virtual server. To install MySQL, open terminal and type in these commands:

#yum install mysql-server
#service mysqld start

During the installation, MySQL will ask you for your permission twice. After you say Yes to both, MySQL will install. Once it is done installing, you can set a root MySQL password:

#/usr/bin/mysql_secure_installation

The prompt will ask you for your current root password. Since you just installed MySQL, you most likely won’t have one, so leave it blank by pressing enter.

Enter current password for root (enter for none):
OK, successfully used password, moving on...
Setting the root password ensures that nobody can log into the MySQL
root user without the proper authorisation.
Set root password? [Y/n]
New password:
Re-enter new password:
Password updated successfully!
Reloading privilege tables..
 ... Success!
Remove anonymous users? [Y/n] y
 ... Success!
Remove test database and access to it? [Y/n] y
 - Dropping test database...
 ... Success!
 - Removing privileges on test database...
 ... Success!
Reload privilege tables now? [Y/n] y
 ... Success!
Cleaning up...
All done!  If you've completed all of the above steps, your MySQL
installation should now be secure.
Thanks for using MySQL!

Set the processes to run automatically when server boots

#chkconfig mysqld on

Step Three Install PHP
To install PHP on your virtual private server, open terminal and type in this command:

#yum install php php-mysql

Once you answer yes to the PHP prompt, PHP will be installed. Restart Apache (php will run automatically once Apache starts):

#service httpd restart

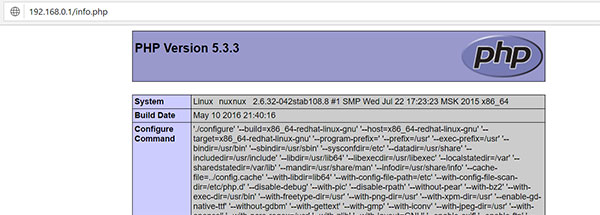
Test PHP by create info.php at /var/www/html/

#vi /var/www/html/info.php
<?php
phpinfo();
?>

Then access browser http://ipaddress/info.phpphp-info

Install PHP-GD library
PHP GD is PHP Modules to support manipulating images like imagejpeg, imagedestroy, etc

#yum install php-gd
#service httpd restart

Check if PHP-GD has been successfully integrated with PHP Modules

#php -m
[PHP Modules]
bz2
.....
gd
.....
mysql
.....

check if “gd” available on the list

Setup Basic Iptables Firewall on Centos 6 Web Server

Iptables should be installed by default on all CentOS 5.x and 6.x installations. Check to see if iptables is installed on system by:

#rpm -q iptables

If not installed yet, iptables can install by:

#yum install iptables

Run the following commands to start Iptables and run on boot

#chkconfig iptables on

And to see if iptables is actually running:

#service iptables status

Check iptables currently loaded rules modules:

#iptables -L -n

Now Set Up a Basic Iptables Firewall on Centos 6 from Digital Ocean 

Decide which ports and services to open
First, we want to leave SSH port open so we can connect to the VPS remotely: that is port 22.

Also, we need port 80 and 443 (SSL port) for web traffic.

For sending email, we will open port 25 (regular SMTP) and 465 (secure SMTP).

To let users receive email, we will open the usual port 110 (POP3) and 995 (secure POP3 port).

Additionally, we’ll open IMAP ports, if we have it installed: 143 for IMAP, and 993 for IMAP over SSL. Note: It is recommended to only allow secure protocols, but that may not be an option, if we cannot influence the mail service users to change their email clients. Block the most common attacks.

First we flush the firewall rules – that is, erase them all:

#iptables -F

We can then add a few simple firewall rules to block the most common attacks, to protect our VPS from script-kiddies. We can’t really count on iptables alone to protect us from a full-scale DDOS or similar, but we can at least put off the usual network scanning bots that will eventually find our VPS and start looking for security holes to exploit. First, we start with blocking null packets.

#iptables -A INPUT -p tcp --tcp-flags ALL NONE -j DROP

We told the firewall to take all incoming packets with tcp flags NONE and just DROP them. Null packets are, simply said, recon packets. The attack patterns use these to try and see how we configured the VPS and find out weaknesses. The next pattern to reject is a syn-flood attack.

#iptables -A INPUT -p tcp ! --syn -m state --state NEW -j DROP

Syn-flood attack means that the attackers open a new connection, but do not state what they want (ie. SYN, ACK, whatever). They just want to take up our servers’ resources. We won’t accept such packages. Now we move on to one more common pattern: XMAS packets, also a recon packet.

#iptables -A INPUT -p tcp --tcp-flags ALL ALL -j DROP

Allow iptables to respond to ping requests from outside network to our VPS server

#iptables -I INPUT -p icmp -m icmp --icmp-type echo-request -j ACCEPT

We have ruled out at least some of the usual patterns that find vulnerabilities in our VPS. Open up ports for selected services. Now we can start adding selected services to our firewall filter. The first such thing is a localhost interface:

#iptables -A INPUT -i lo -j ACCEPT

We tell iptables to add (-A) a rule to the incoming (INPUT) filter table any trafic that comes to localhost interface (-i lo) and to accept (-j ACCEPT) it. Localhost is often used for, ie. your website or email server communicating with a database locally installed. That way our VPS can use the database, but the database is closed to exploits from the internet. Now we can allow web server traffic:

#iptables -A INPUT -p tcp -m tcp --dport 80 -j ACCEPT
#iptables -A INPUT -p tcp -m tcp --dport 443 -j ACCEPT

We added the two ports (http port 80 and https port 443) to the ACCEPT chain – allowing traffic in on those ports. Now, let’s allow users use FTP and SMTP servers:

#iptables -A INPUT -p tcp -m tcp --dport 21 -j ACCEPT
#iptables -A INPUT -p tcp -m tcp --dport 25 -j ACCEPT
#iptables -A INPUT -p tcp -m tcp --dport 465 -j ACCEPT

Like stated before, if we can influence our users, we should rather use the secure version, but often we can’t dictate the terms and the clients will connect using port 25, which is much more easier to have passwords sniffed from. We now proceed to allow the users read email on their server:

#iptables -A INPUT -p tcp -m tcp --dport 110 -j ACCEPT
#iptables -A INPUT -p tcp -m tcp --dport 995 -j ACCEPT

Those two rules will allow POP3 traffic. Again, we could increase security of our email server by just using the secure version of the service. Now we also need to allow IMAP mail protocol:

#iptables -A INPUT -p tcp -m tcp --dport 143 -j ACCEPT
#iptables -A INPUT -p tcp -m tcp --dport 993 -j ACCEPT

Limiting SSH access

We should also allow SSH traffic, so we can connect to the VPS remotely. The simple way to do it would be with this command:

#iptables -A INPUT -p tcp -m tcp --dport 22 -j ACCEPT

We now told iptables to add a rule for accepting tcp traffic incomming to port 22 (the default SSH port).

Find out your outside IP address by type:

# w
11:42:59 up 60 days, 11:21, 1 user, load average: 0.00, 0.00, 0.00
USER TTY FROM LOGIN@ IDLE JCPU PCPU WHAT
root pts/0 213.191.xxx.xxx 09:27 0.00s 0.05s 0.00s w

Now, you can create the firewall rule to only allow traffic to SSH port if it comes from your IP address:

#iptables -A INPUT -p tcp -s YOUR_IP_ADDRESS -m tcp --dport 22 -j ACCEPT

Replace YOUR_IP_ADDRESS with the actuall IP, of course.

We could open more ports on our firewall as needed by changing the port numbers. That way our firewall will allow access only to services we want.
Add one more rule that will allow us to use outgoing connections (ie. ping from VPS or run software updates);

#iptables -I INPUT -m state --state ESTABLISHED,RELATED -j ACCEPT

It will allow any established outgoing connections to receive replies from the VPS on the other side of that connection. When we have it all set up, we will block everything else, and allow all outgoing connections.

#iptables -P OUTPUT ACCEPT
#iptables -P INPUT DROP

Now we have our firewall rules in place. Save the configuration.
Now that we have all the configuration in, we can list the rules to see if anything is missing.

#iptables -L -n
Chain INPUT (policy DROP)
target     prot opt source               destination
ACCEPT     all  --  0.0.0.0/0            0.0.0.0/0           state RELATED,ESTAB       LISHED
DROP       tcp  --  0.0.0.0/0            0.0.0.0/0           tcp flags:0x3F/0x00       
DROP       tcp  --  0.0.0.0/0            0.0.0.0/0           tcp flags:!0x17/0x0       2 state NEW
DROP       tcp  --  0.0.0.0/0            0.0.0.0/0           tcp flags:0x3F/0x3F       
ACCEPT     all  --  0.0.0.0/0            0.0.0.0/0
ACCEPT     tcp  --  0.0.0.0/0            0.0.0.0/0           tcp dpt:80
ACCEPT     tcp  --  0.0.0.0/0            0.0.0.0/0           tcp dpt:443
ACCEPT     tcp  --  0.0.0.0/0            0.0.0.0/0           tcp dpt:25
ACCEPT     tcp  --  0.0.0.0/0            0.0.0.0/0           tcp dpt:465
ACCEPT     tcp  --  0.0.0.0/0            0.0.0.0/0           tcp dpt:110
ACCEPT     tcp  --  0.0.0.0/0            0.0.0.0/0           tcp dpt:995
ACCEPT     tcp  --  0.0.0.0/0            0.0.0.0/0           tcp dpt:143
ACCEPT     tcp  --  0.0.0.0/0            0.0.0.0/0           tcp dpt:993
ACCEPT     tcp  --  0.0.0.0/0            0.0.0.0/0           tcp dpt:22
Chain FORWARD (policy ACCEPT)
target     prot opt source               destination
Chain OUTPUT (policy ACCEPT)
target     prot opt source               destination

The -n switch here is because we need only ip addresses, not domain names. Ie. if there is an IP in the rules like this: 69.55.48.33: the firewall would go look it up and see that it was a digitalocean.com IP. We don’t need that, just the address itself. Now we can finally save our firewall configuration:

#iptables-save | tee /etc/sysconfig/iptables
# Generated by iptables-save v1.4.7 on Sat May 14 05:05:52 2016
*raw
:PREROUTING ACCEPT [5758:5496095]
:OUTPUT ACCEPT [3894:466098]
COMMIT
# Completed on Sat May 28 05:05:52 2016
# Generated by iptables-save v1.4.7 on Sat May 14 05:05:52 2016
*mangle
:PREROUTING ACCEPT [5758:5496095]
:INPUT ACCEPT [5758:5496095]
:FORWARD ACCEPT [0:0]
:OUTPUT ACCEPT [3894:466098]
:POSTROUTING ACCEPT [3894:466098]
COMMIT
# Completed on Sat May 28 05:05:52 2016
# Generated by iptables-save v1.4.7 on Sat May 14 05:05:52 2016
*filter
:INPUT DROP [0:0]
:FORWARD ACCEPT [0:0]
:OUTPUT ACCEPT [12:2592]
-A INPUT -m state --state RELATED,ESTABLISHED -j ACCEPT
-A INPUT -p tcp -m tcp --tcp-flags FIN,SYN,RST,PSH,ACK,URG NONE -j DROP
-A INPUT -p tcp -m tcp ! --tcp-flags FIN,SYN,RST,ACK SYN -m state --state NEW -j        DROP
-A INPUT -p tcp -m tcp --tcp-flags FIN,SYN,RST,PSH,ACK,URG FIN,SYN,RST,PSH,ACK,U       RG -j DROP
-A INPUT -i lo -j ACCEPT
-A INPUT -p tcp -m tcp --dport 80 -j ACCEPT
-A INPUT -p tcp -m tcp --dport 443 -j ACCEPT
-A INPUT -p tcp -m tcp --dport 25 -j ACCEPT
-A INPUT -p tcp -m tcp --dport 465 -j ACCEPT
-A INPUT -p tcp -m tcp --dport 110 -j ACCEPT
-A INPUT -p tcp -m tcp --dport 995 -j ACCEPT
-A INPUT -p tcp -m tcp --dport 143 -j ACCEPT
-A INPUT -p tcp -m tcp --dport 993 -j ACCEPT
-A INPUT -p tcp -m tcp --dport 22 -j ACCEPT
COMMIT
# Completed on Sat May 14 05:05:52 2016
# Generated by iptables-save v1.4.7 on Sat May 14 05:05:52 2016
*nat
:PREROUTING ACCEPT [194:11875]
:POSTROUTING ACCEPT [189:13643]
:OUTPUT ACCEPT [189:13643]
COMMIT
# Completed on Sat May 14 05:05:52 2016

The iptables configuration file on CentOS is located at /etc/sysconfig/iptables. The above command saved the rules we created into that file. Just to make sure everything works, we can restart the firewall:

#service iptables restart
iptables: Setting chains to policy ACCEPT: raw mangle filte[  OK  ]
iptables: Flushing firewall rules:                         [  OK  ]
iptables: Unloading modules:                               [  OK  ]
iptables: Applying firewall rules:                         [  OK  ]

The saved rules will persist even when the VPS is rebooted